Monday, June 24, 2019

Long live the Lilacs

(I hope.)

There was a large overgrown flower bed outside my back door. It's between the house and the shed. It was so overgrown I could barely see the shed from the bathroom window. It contains Peonies, Irises, Hosta, Phlox, False Solomon Seal, Honeysuckle, and white Lilac.
There is also blackberry, raspberry, wintercreeper euonymus, goldenrod, black walnut saplings, maple suckers, and poison ivy, all of which I pulled out with ruthless abandon.

The Hosta/Peony/Phlox end of the bed is overgrown and needs to be divided (by quarters!) but that has to wait for fall. The Honeysuckle/Lilac end of the bed needed to be pruned after flowering.
I have read,( and seen), that you can rejuvenate old lilacs by cutting them back HARD. I took a deep breath and started cutting back. And cutting back.
It was a long work in progress, because I'd do a little when I'd get home from work. There's no great before pictures - just imagine a lot of green blocking one building from being able to see the other.
As of last night, I only need about 4 more bags of mulch, and I think this bed is done until the dividing.
View from the shed. That whole mulched area was just a tangle of plants.
I've put brown craft paper under the mulch to act as a biodegradable weed barrier.
I'm hoping it slows the poison ivy, forcing it to struggle, so I can see it and pull it easier where it emerges.

View from the house. I'm hoping I didn't murder the lilacs and the honeysuckle.
The honeysuckle can be invasive, so if I killed that, I won't be sad.
But I will be a bit miffed with myself if I killed the lilacs
I figure I'll divide/move some of the hosta and irises around to even out the edges.

Adventures in Electricity

Sunday, Ian came over and we set about having adventures in homeowner electricity. There were a bunch of things I wanted to get done, and I know that they were simple enough tasks, but I just didn't have the confidence to tackle them myself.
There aren't a lot of pictures, because I was busy learning, helping and doing. But this one makes me happy.
This is the new GFCI outlet in the kitchen. The one that was there would trip when I'd turn off the light over the kitchen sink. When we pulled the old one out to look at what was going on, we discovered some questionable wiring practices, and also that the outlet was a little older than I'd have liked. We re-did the wiring and replaced the outlet. I LOVE the little indicator light. It turns red if it trips. So far, no tripping!
We fixed the outlet in the den that got smashed to smithereens when a large picture fell off the wall. That was uneventful. We ran a line down from the second floor that will eventually go to a roof vent fan - also, relatively uneventful. We also ran a line over to the scary corner of the basement, which was a bit more eventful and frustrating than it should have been, but in the end we overcame, and now I have 4 working outlets - 1 for the LED strip light and 3 for tools and/or a dehumidifier.
It was a long day, I learned a lot, and now I'm a little more comfortable fixing outlets and switches. Many thanks for Ian for holding my hand through it.

Wednesday, June 19, 2019

Adventures in plumbing

The kitchen sink had been leaking. Where it had been an occasional drip, it turned into a once a minute drip, and then a once every 10 seconds drip.
Intuition led me to believe that it was the hot water side leaking, and since my hot water is electric, this had the potential to be pricey if left unchecked.
While I was at Ian's over the weekend, we stopped by Lowes and I picked up the Moen Torrance Faucet and Sprayer. I had wanted a single handle design, and something that looked a little nicer than what was there.
Let's get this done.
The first thing to do was to get the old one off, which was a bit of a struggle. It had been on there a while. But tools and proper angles won the day, and it came off. The hardest part was getting off the two white nuts that held the old fixture down. There was just no good angle to get a wrench on them easily.
NUTS.
(Also, notice the rust.)
Oh yay! Happy day! It came off! And what did I find under the base plate?
No plumber's putty and rust. Lots of rust.
Old fixture is in the sink in the lower right.
That clear plastic gasket wasn't doing jack to keep the water out.
I had thought this might be the case because of the orange water that would leach out from under the plate when I was wiping up the area after dishes. I had no idea it was this bad though.
I got out the Barkeeper's Friend and a Scotchbrite and got to work.
The problem is that no amount of elbow grease will put back metal from where it's been dissolved.
All the black marks are pitting and pinholes.
The brown is surface rust.
I couldn't be replacing the basin last night at 8 pm, (well, I could, but I didn't want to.)
The intention (foolish as it may be) is to redo the kitchen eventually, so I'm going to try not to worry about it, and just keep the area as dry as possible from now on.

FYI - this faucet, for what I paid for it, was awfully cheap. A lot of the parts are plastic, and just don't feel like they are going to hold up over time. Also, the directions were sort of junk - they completely missed a piece, and were very difficult to follow. I get that everyone's cutting corners, but geez.
I did get it installed, and I'm pretty pleased with the results.
It doesn't leak, which is the whole point, so I consider it a success.
Tada! New faucet.


Monday, June 17, 2019

A pause for something different

This weekend I put the house on pause and drove out to Ian's, where we, along with 8 other friends, constructed his long-awaited shop. He needed a space where he could could work in out of the elements.
My good friend Monique took much more comprehensive pictures from the beginning, which can be found here, but I took a few between activities.
It was a pile of shaped lumber at 9 am on Saturday morning.

This plate gave us a heck of a time, but wood is resilient.

Bill surveys the work from above.

Mighty like ants.
From L-R: Ken, Bill, Ian, Dave, Windy, Lillie, Monique, and myself (on the ladder).
Not shown: Claire and Dave 2.

Bill and Ian pause for a moment with the flooring on the first floor almost done.
Everyone was sort of on auto-pilot at this point, and pretty well beat.

Dinner! Toss an old door over the work bench and throw out a Burgers and Dogs spread.

The light at the end of the day was very Hudson River School. Very appropriate way to end things.

We all agreed that the only way to make this more Instagram worthy was to add white Christmas lights.

It was a great time, and truly inspiring what can happen when you get a group of like-mided people all pointed and pulling in the same direction.

Wednesday, June 12, 2019

Buckets!

Mom had started a bunch of tomatoes, of which I now have 3. There's no obvious vegetable garden are, so I elected to use the 5 gallon bucket method. I just need one more cage to even things out, but This variety (I think it's Cherokee Purple) can go over 5', so I might need to build them some sort of trellis.
Buckets of tomatoes!

Monday, June 10, 2019

Better luck next time

I had to go out to the farm and check on the bees - good thing I did, one hive was getting cramped and thinking about planning a swarm. They have enough room now, they should be happy for a few weeks.
It meant that I only had one day to get things done, and it got hot fast. I got a trash bag worth of poison ivy pulled, the lawn mowed, the driveway swept and the cracks treated with vinegar, and the overgrown white lilac taken down by the back door. (Thus making the brush pile big again. sigh.)
That garden currently looks like crap - like an over gown toddler got loose with scissors and mauled the bushes. There's a honey suckle in there that caught part of the pruning, but still needs more. A few thing happened about the same time - I noticed some very healthy poison ivy growing in there, and I wasn't properly gloved for dealing with it; it reached peak hot for the day; and I ran out of giddyup. This last part was probably because I wasn't drinking or eating enough. I called it quits, dragged myself to the shower and then to bed for a nap. (I don't nap.)
I had wanted to get the last of the basement clean out and the cellar stairs painted, but that wasn't going to happen. I felt like I'd been hit by a truck, so I made dinner and binge watched some Tv.

But here's some pretty pictures of what's flowering!
Single peonies and Siberian irises

I have found one hill of white/yellow irises out back.
I'd like to divide and sprinkle this around to breakup all the purple, but there's not much of it.

I do have one double peony plant!
Big floppy happy plants.

There's a mock orange out by the shed.
It needs a hard haircut, and the branches above it need a hard trim.

Single peonies

Iris and False Solomon's Seal.

The rhubarb is going to flower.

Front of the house. That whole bed is purple iris, purple spiderwort, and poison ivy.
This whole area needs to be reworked, but I'm afraid the only solutions are going to be well beyond my budget.

Monday, June 3, 2019

Let there be light?

When last we left our excitable homeowner, she'd finished making the front foundation pretty.
Prettier.

Earlier in the day, I'd gotten it into my head that I wanted the concrete planter stand gone from the front of the house. There was only one, to the right of the door, it was kind of ugly, and if I was going to do something, I was was going to do it once and right.
At about 9:30 am, I got out my gloves and sledge hammer and started whaling away on the cube. It reminded me of the pads in the cemeteries where you'd put a cement urn for flowers. Considering I'd just helped my mom put flowers in just such urns, I had them on my mind. The center square was different than the rest, but I chalked it up to weathering with a long gone urn on top.

It didn't want to budge. At all.
I started putting some heft into it - my very best "I'm going to win that danged stuffed critter at the fair game" hammer blows. The center started to break up!
Progress!
I started to pull out the center pieces. It was coming out very... uniform.
Specifically square.
Almost as if the center had been poured after... the edges...
After pulling out about 4-6" of cement, I encountered sand. Lot of it. The sort of sand that felt sharp and masonry-like.
And in the sand was buried bricks.
I was hoping for treasure. (This house is wanting for treasure.)

It was at this point that something clicked in my brain. There's a funny window thing in the basement, small and square-ish and boarded over from the back.
Could it... was it... no...

Oh But Yes It Was.
At some point, after the granite step was put in, someone took the time to pour a window well for this one tiny window.
They didn't bother to pour the rest of the apron the seven or so feet to the corner of the house.
(Just a blob of a window well.)
Which then later someone else decided they didn't want any more, so they slapped a piece of 1/4" plywood behind the window, filled the void with grey cement bricks, poured a ton of sand over the bricks, and then iced this halfassed cake with cement.
Excavating the window well from the outside.
This is where I got half of the grey bricks I used for edging this side of the house, and the sand to sort of bed them.


Excavating the window well from the inside.
Shop vac to the rescue.

The frame for the window is shot. As you can see, it's gone on the bottom, and the sides are eaten/rotted almost all the way up.

This leaves me with a conundrum.
On one hand, it's nice to have natural light into that part of the basement. I'm sure that's what they were thinking at the time when they put it in. It can't be made bigger - on one side is the massive piece of front step granite, and on the other side is a massive piece of foundation granite that holds up the house.

On the other hand, while functional, the window well is ugly, and it's Right There. If it was more neatly poured, or not stuck to the front of the house like a concrete pimple, I'd probably just rebuild a window for the space and call it good.
But it's not somewhere else.

Eventually, I think I'm going to remove the window well, (or at least the top bit) find some stone, and close it up right, probably when I'm re-pointing the basement.
For now, I've got some of my super-handy roofing slates covering up the hole so that small mammals don't decide my home is their home.

I'll have to deal with it at some point before the winter.
The slate is almost exactly the right size to cover the hole.
Rodent, but not insect proof.

It started with the goldenrod

On Saturday, I noticed that the very large beds in the side yard were overrun with blackberry and goldenrod. I hadn't noticed because the goldenrod kind of looks like the tall phlox. The bed is shared with Siberian Irises and Peonies that were starting to look very shaded out.
I started pulling. And pulling.
Made my way through those to beds and around to the front bed where I decided to spend a little time pulling poison ivy. After doing that for long enough to know I'd probably gotten at least a little on my arms, I turned my attention to the front foundation of the house.

At some point in the distant past, a concrete apron was poured around the edge of the house. On the north and south side, it's a good foot+ out from the house. On the west side, it's only maybe 6". On the east side, (the front), it didn't appear to have any apron at all.
Well, that's not entirely true.
Upon further examination, to the left of the front door, there appeared to be a foot wide apron extending up to a poured concrete window well. I thought that perhaps, over time, the soil level and vegetation had just come up over the apron along the rest of the front, and that it needed to be exposed.

A little back story about why I was compelled to expose the apron and/or foundation -
The other night, I came home to find a big fat black ant sitting squarely in the middle of my bed.
The carpenter variety.
Big enough where even the cat just looked at me blankly, as if to say, "awe heck no. That's your problem."
I'd treated the foundation with Ortho Home Defense granules, but this bugger got through.
Carpenter ants will send out foragers in the spring to locate food and new digs. I'm betting that's what this one was, but I can't have anything insect related thinking this was a good idea.
The ant got squashed, and I got to have dreams about giant monster ants eating my house that night.
My foundation and thus my wooden sill are perilously close to surface ground level. This is likely because the house was built into the side of a slope 150 years ago, and soil has been washing down and building up ever since. Short of something ridiculously drastic like major heavy-equipment landscaping or jacking the house up and extending the foundation by a foot, that is not going to change. But I can make sure that I'm not providing insects any easy access to my abode.
Friends, please understand - No matter what Home Depot or Lowes or HGTV try to sell you, foundation plantings are just not a good idea, particularly when your house is made out of a delicious insect buffet. Mulch and vegetation provide a highway right into your home. It also holds moisture against your home, which for anything wood is not a stellar idea.
This is the window well that must have used up the last of the cement.
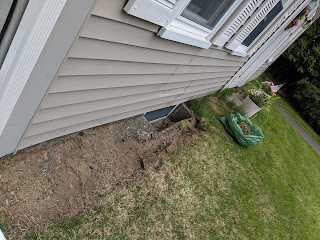
I started digging. The apron only went to the window well and stopped. I don't know why, it sort of felt like they ran out of cement and called it quits. But someone had taken the time to run a line of bricks under the drip edge of the roof over to the front step. Only to the left of the front door, there was nothing to the right. The soil was an average about 3" from the siding, and grass was actively growing up under it.
Saturday, I took the grass and dirt down about 4-6 inches. That brought us to here:
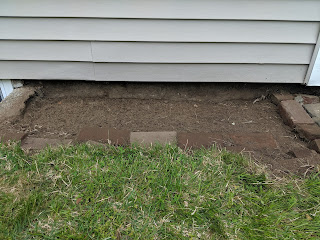
There's the bricks that were hiding under the grass.

And dug out.
Sunday I got up, determined to finish the front. If you go back and look at that last photo, you'll see a funny concrete platform next to the granite step. (The step is also level with the ground and will need to be addressed, as currently my front door doesn't meet code.)
If I was going to spend my time and money making the front of the house pretty, I wanted that cement slab gone.
I got out my sledge hammer and mason's hammer and... that's a story for a different post.
The short of it is I have a new/old window in my basement, about 12 free grey cement bricks and about 50 lbs of sharp sand.

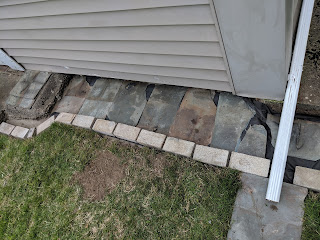
I re-edged the grass, and took the bricks I'd excavated out from the left side of the door and inserted them behind the granite step to replace the crumbling ones there, filling the gaps with the sand. The bricks are really neat - there's different names stamped into them, so I made sure they were name side up.
I need to wash the lichens off the house.

 Then I went to Home Depot, where I got weed block cloth, 14 more grey cement bricks, and 7 sacks of crushed bluestone. I know I probably could have gotten the stone cheaper in bulk, but I don't need a whole yard of stone, and I don't have a truck.
When you have all the stuff you need, things go surprisingly quickly.
I cut the fabric and put down a double layer, laid some roofing slate flat and sprinkled it with ant and grub killer. I figure the slates  will help keep the weeds down.
Nice and flat.

Ta Da!
So much cleaner!

So much easier to keep the bugs away!

I hear you now - "Why?! Why is there a brick missing in the middle?"
Well, because there's a rock that's tied into the cement of the window well that sits right below the surface.
So, a gap.
Not ideal, but I don't need to be pouring new window wells.

Which brings me back to that funny cement platform I was beating up with a sledge hammer...