Monday, September 20, 2021

The Chimney - A conclusion, of sorts. And doors.

 Last I wrote, I was knee-deep in in parging the chimney.
I had Friday off, so I swung over to the masonry supply place, grabbed two more buckets, and got it done. This time however, I:
1) Dumped the mix into my trusty kitty-litter pan to mix rather than try to mix it in the bucket, and
2) Added more water. Instead of 3ish cups, I went for a solid 4.5. I probably could have gotten away with 4.25, but it worked.

I had juuuuust enough to finish the 2 exposed sides of the chimney.

Where I left off. The raking light from the lamp on didn't help matters.

One side done - under natural light, it doesn't look half bad.

The second side done. It's not very smooth, but it's encased.

I'm curious to see how well this holds up. It seems very secure now that it's complete and curing. After talking with Ian, once it's good and cured in a month or two I'm going to top dress it with drywall compound. (The surface is certainly rough enough for it to stick now, where it wouldn't have stuck to the smooth painted/plastered finish that was still hanging around on the old surface.) I'll be able to sand the drywall compound down for a smoother finish that will mimic more closely what was there. Then I can paint it to match the room.
I still need to get out my fine sandpaper and scrapers out try to get the paint off the trim that was left over from when previous owners had boxed in this area. A little oil and a coat of shellac should blend it ok. It's behind the door, so it's not super noticeable, but I'm a completest.

After the chimney on Friday, I pulled one of the doors off in the office and started stripping it. Back when I flipped the office in the depths of the pandemic, I did the room, but didn't have time to get to the doors. Now that it's not stinking hot out, I can strip stuff outside instead of having to have a freind come help me get it down to the basement.

The set up. I figured out how to make my sawhorses taller (!) and reused the plastic from solarizing my worms as a drop cloth so I didn't get paint chips everywhere. It worked out really well.

6.5 hours and some really sore muscles later, I have one entirely heat stripped door. Having it higher did help. Next step, sanding.

This is the door that is closest to the front door in my office. Like every other door in the house, I'm fairly certain it started life somewhere else and was repurposed.

Two strips have been added to the top of the door to make it taller. (Not just one!)

The are under the knob plate is a hot mess. They are little circular iron rounds, with 3 pricks, ostensibly for stability - they would stab the wood, and with the help of 2 tiny screws hold it down. Can't have longer screws because the metal housing of the mortise lock is right behind it, only 3/16" away. Decades of use and repositioning turned those pricks into saw teeth. The other side of the door is worse. *Edit - I talked about this 2 years ago!

The other side of the door (which you can't see well) and the mortise lock pocket. You can see on the bottom of the close edge corner where the wood started to blow out a long time ago. I'm certain there's a complicated right way to fix this. I think it's going to involve glue and filler in my case, and maybe different style plates to cover up the knob mess - even if I hit the area with wood filler, those little teeth are just going to keep grinding away.

That's where I got on Saturday. Sunday I trimmed back some brush that had grown up along my driveway and killed another 400+ worms. I'm hoping I have time this week and the weather holds out so I can drag the door back out side to sand it.

Monday, September 13, 2021

Attempt at the chimney; I'm not a mason.

One things that's been bugging me is the back chimney upstairs. It's one of the last things that really needs to be done on the second floor, and I just wanted to get it done. I had done a bunch of research and talked to Ian about how to deal with a plastered chimney. Heck, I even emailed  "This Old House" about it. I never heard back. I guess my head shot didn't do it for them (Yes, you need to submit a head shot when you submit your project.)

I went around the corner to the local masonry supply place. I won't disparage them online, but once this project is done I will never patronize them again. I walked in (masked, it's still a pandemic despite everyone's hopeful wishes), and got an exasperated and annoyed look from the older man behind the counter. There was a younger man and a younger woman also behind the counter, but they were busy with other customers. I wound up with the Unmasked Grumpy Old Man Who Didn't Have Time for a Home Owning Dilettante Middle Aged Woman.

I politely introduced myself and explained what I was looking for. "I'm looking to fix my chimney, and I'm told I should use a product called Structolite". I said. "We don't carry that," he replied, in the annoyed "you're wasting my time, girly" tone every woman knows.
I should have politely left at this point, but I wanted to just deal with the damned chimney, and this guy was between me and that goal.
I switched tactics and decided to beat him up with my brain, which is not a thing I like doing, but I dislike condescending Old Men more.

"Ok, look. I'm looking to repair a parged chimney, installed in the house when it was renovated sometime around 1860, capped off last year. It was always a coal-fired fuel source, and leaches residual scents. It's exposed on 4 sides in a 2nd floor bedroom. At some point suffered water damage, probably from a leaking roof. As a result the brown coat and the fine coat have deteriorated and have let go in some sections, leading to a patchy look and possible lead exposure that I would like to encapsulate."
He had the good grace to loose a little of the attitude. Certainly not all, but some.
"Oh. Well. I guess we have this stuff over here you can use." And he took me over to a shelf that held little 1 gallon buckets of something called "InsulStick". I looked mildly doubious. "Is it trowelable? Can it be smoothed? Is it paintable?"
"Yes, yes, it's similar to the other stuff you wanted." he muttered.

It was at this moment I hit the point that other women also know. The "Let's Throw Money At This Situation So I Can Get the Eff Out of Here and Away From This Jackass" point. It's a weird place where you're tired of trying to remain steadfast in your needs, are trying to salvage your time and still move the project forward. This very point of frustration is also how I wound up with a fridge and washer/dryer that I wasn't in love with.

I bought the dubious bucket of stuff, got the heck out, and set it aside where it mocked me.
I now had $30 invested in this fiasco. The situation stung, but here I was.

This past weekend I got the bucket out and read it carefully.
Bush existing Masonry well. Check.
Moisten the existing masonry surface. Check.
Mix 3-4 cups of water with product for handpacking. Ok.... Well, this is a vertical surface, so I wanted it stiffer and not liquidy. I started with 3. I quickly added another 1/2 cup. Mixing in the bucket provided was difficult, and in the end it didn't wind up mixing consistently.
I had my trowel and a float - I find the hawk is too big and my wrist strength is pitiful, so I use a float as a hawk. I loaded up my little float-hawk and start smooshing it on. I mean, really, I'm smooshing mud on a surface, this shouldn't be all that difficult.
Except it was. This mud was full of largish particulates. It did not want to work. It was super rough and could not be smoothed. I persevered, and toward the end added more water to what was left. That made it a little better, but I'm left with a finish that looks exactly like what the jackass at the masonry store would expect out of middle-aged-white-woman me, and that chaps my... butt.

Also, the tiny bucket only did about a 1/4 of the job. So now I have to go back to a place I never want to go back to and get more.

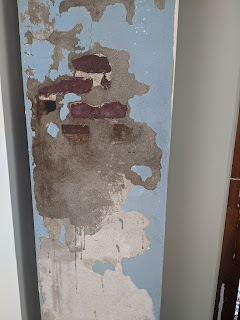
Where the plaster has been falling off. The top is where I've already moistened it.

Halfway through moistening one side. I only intend to do the two sides facing out into the room, though technically it's exposed on all four. I can't get my arm in that 4th side.


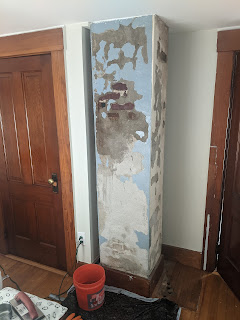
I started applying it from the top down, when maybe I should have applied from the bottom up.
This is as flat as I could get the finish. It resisted feathering.

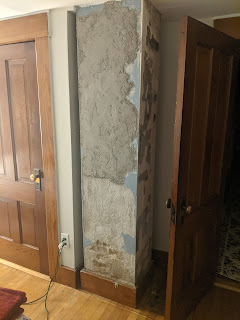
Here we are the next morning - you can see where I had to stop because I ran out. It's drying very dark, which leads me to think there's a TON of portland cement in it.

So there's where I'm at. I won't be surprised at all if this whole thing falls right off the chimney in one big cementy slab. There's no bonding agent as far as I can tell, so the old brown coat behind it is likely to just let go at some point. 

It looks... better? Sort of? If you like unintentionally rustic?

My next step is to get a couple more buckets of the stuff, mix it thinner in my kitty-litter pan, not the bucket, and give it another go. Maybe a thin coat will smooth it out some.

Tuesday, September 7, 2021

Let's talk a little more about worms.

I know, this is the most boring topic to everyone except me, but I'm working hard to try to get more people to take it seriously.

Last we talked, I'd solarized a bunch of dirt and was on the look out for worms. Since then, I've come to the conclusion that they probably came in on the mulch I'd gotten last year as well as the topsoil I'd gotten this year. I've joined an online group of homeowners overrun with these things, trying experiments in control. I've done a lot of reading, and a lot of worm killing. It's not fun. I don't have exact numbers, but I've probably killed about a 750 worms since figuring out I had a problem, and that's just from the 3/4 acres I maintain around the house.

An average sized Jumping worm.
 

Because no one was really paying attention, these wriggly *ssholes have spread pretty far, pretty fast. Popular for fishing (because of their thrashing) they've gotten into the waterways and floated around. They've hitched rides in soil, mulch, on landscaper's machines, in shared and purchased plants; some people even wonder if they've tracked the cocoons in on the treads of their shoes. (The eggs, or cocoons, are only 2mm big, and look like dirt.) Some folks thought they were safe because they bought bagged products - but if they were stored on the ground, and there are worms on the ground and holes in the bags, there's worms in the bags. Note: Grab your bags from the tops of the stack, and ask if they've been treated to over 104*. If you can't find out that info, leave your bags out on the blacktop for a few really good sunny days. Clear bags work better than black for solarizing, come to find out.

The first batch of worms I hand picked out of my property (north of 300 worms) I tried to drown in water. It took over 24 hours for them to die. It was disturbing. Now I have a bucket into which I put 2" of icemelt and then layers of worms. They self-generated their own poisonous brew as they decomposed. This kills them in about a minute, but I'll warm you, it's gross. It doesn't stink so bad as the bucket of water, but it still has a smell.

A pile of worm castings (poop).

The "coffee ground/taco meat" effect of their castings en mass.

The crumbly results. This is washing down from above my house where I had a mulch bed.
This could be very bad news of the embankment behind my house lets go - the soil is already very shallow over the ledge.
The crumbling mess is a nightmare for shallow rooted plants. It also doesn't hold water. It's like pebbly silt.

I haven't done anything beyond solarizing where I could and hand-picking the adults where I find them. I've set up "worm traps"  - flat rocks in contact with the dirt with a little organic matter under it, or small sheets of cardboard with a rock on top to weigh it down. They seems to be drawn to glass clippings. I hate it - it makes my yard look like a mess. I've also tried "grunting" or "fiddling" for worms - where you take a notched stick and run another stick over it, sending vibrations into the ground. It drives the worms up, thinking they are escaping from moles.
Other folks are experimenting with just about everything you can imagine - diatomaceous earth, bio-char, alfalfa pellets, spent tea leaves, Irish Springs soap, funguses. Some folks are trying to limp their plants along by deep-mulching them in compost, but that also feeds the worms. Some people think it's best to try to starve them out. Other folks like me are just trying to pick them by hand, but it's a loosing battle. Some feed them to chickens - some chickens are freaked out by the snake-like movements and won't touch them, others love them. There's a lot of concern that the worms collect heavy minerals though, and that can be passed along to whatever eats the worms. (At this point only some chickens, moles and opossums appear to enjoy the worms.)
Folks are finally starting to pay more attention because this could directly impact the maple industry. Sugar maples are already at risk from the warming climate, and they do NOT like their roots exposed. People start to get serious when you threaten their pancakes. I know Cornell, UMASS and at least one school in Wisconsin are studying them in earnest.

So what can you do so that creatures from a horror movie don't invade your soil? You have to be careful. If you buy material/plants, ask if they know about jumping worms. Look at the top of the soil for the "Taco meat" castings. Knock off the dirt and wash the roots if you suspect worms. Wash off any equipment that had contact with soil. Wipe your feet. Wash your tools. Heck, I might get a deep boot tray and put a light bleach wash out on my porch for my shoes. Leave bagged material in the sun for a few days to solarize to over 104*.

Hope the smart folks come up with some sort of control for them soon.

Here's a short video about me scratching for worms. I'd already gone through and pulled 200+ worms out of this section a few weeks ago. (Sorry, it's hard to film with your left and grab worms with your right.) Toward the 50 second mark you'll see their creepy flippy maneuver - if they feel lightly threatened, they will poke their heads out and slither away. If they feel acutely threatened, they poke their butts out, and then do this flippy thing before slithering away. I think it's because they can detach their tail sections and use it as "bait".