Monday, December 14, 2020

Another day, another length of trim to strip.

 I sat down and had a hard think about what was going to be next, now that the heavy lifting on the office is done. I settled on the hallway between the office/living room/dining room because it seemed I might have just enough stripper left to do what needed to be done. I'm going to need another bucket for the living room and all that window trim.
I have discovered that I'm getting faster with the stripping. Things that help - Schmear it on with a 4" putty knife, treat it like toxic frosting, pre-cut all your lengths of fancy Dumond paper and stage it ahead of time. I can't recommend that last one enough.

Looking towards the dining room.
The trim on the lower right is tight, so I'm just going to hit it with the sander and call it a day.

View from living room into the office (with stairs to the second floor on the left)
Here's where Big Wally's Plaster Magic had to happen on the ceiling. The plaster was a big flexible.
Other than tuning up the ceiling, there's remarkably little spackle work that needs to be done here.

Big Wally's and Stripping now takes time to set, so I worked on a few more things in between. One is finishing up closet door #1 of 2 in the upstairs hallway. I don't have any good before (or after, yet) photos for door #1, just a hole where it was before I took it off to the basement.

Door #1 (hole) and 2 that need to be finished,

Door #2. This poor door has seen some things.
The hinges are wrong, the latch is wrong, the handle latch isn't functional.

It might be hard to tell from this photo, put I want Door #2 to mimic door #3 - The bedroom door on the far left.

Here's where they cobbed on a piece of wood to get the Victorian era brass latch to catch. The gap that would have been easily spanned by the bar of the thumb latch was too big for this little brass latch.
Here we also see the handset for the thumb catch that is currently doing nothing more than being a handle.

This is what the exterior of the bedroom door looks like. In order to make it work with the orientation/door jambs, they used the thumb latch assembly backwards.

Back over here on the other side of the hall, in the closet, we see that the original hook is still on the inside of the door. I don't know why they didn't just flip it around like the other door.

Oh wait. This is why. The back hardware is gone. Removed, one would assume, so it didn't interfere with the door swing, now that it swings out instead of in. You don't want a door opening into the closet.

More evidence that it used to swing in - there's the old mortises on the inside (to the left).
Looks like they tried to move the lift off hinges, but the screws ripped out of this top set.
Going to have to fix this. The bright brass hinges you can see peaking through from the exterior of the door are not acceptable in a house that has zero bright brass hardware.

So the little closet door is in the basement drying (no action shots there) but tonight it will pobably get remounted.

That left me with the Mantle.
You might recall that a while back Ian and I ripped out the nonsense that was holding back the interior of the mantle. It was filthy and interesting. I had it covered up with a piece of paper for a while, but the tape started to give up and it would blow ever so gently in the breeze every time the heat kicked on.


I tore off the paper and leaned a leftover piece of bead board over the hole.
It wasn't quite big enough to cover the hole.
The cat also like the hot air vent.

This is what's back there. Old coal stove pipe with brick infill.
(cinder block modern furnace chimney behind)

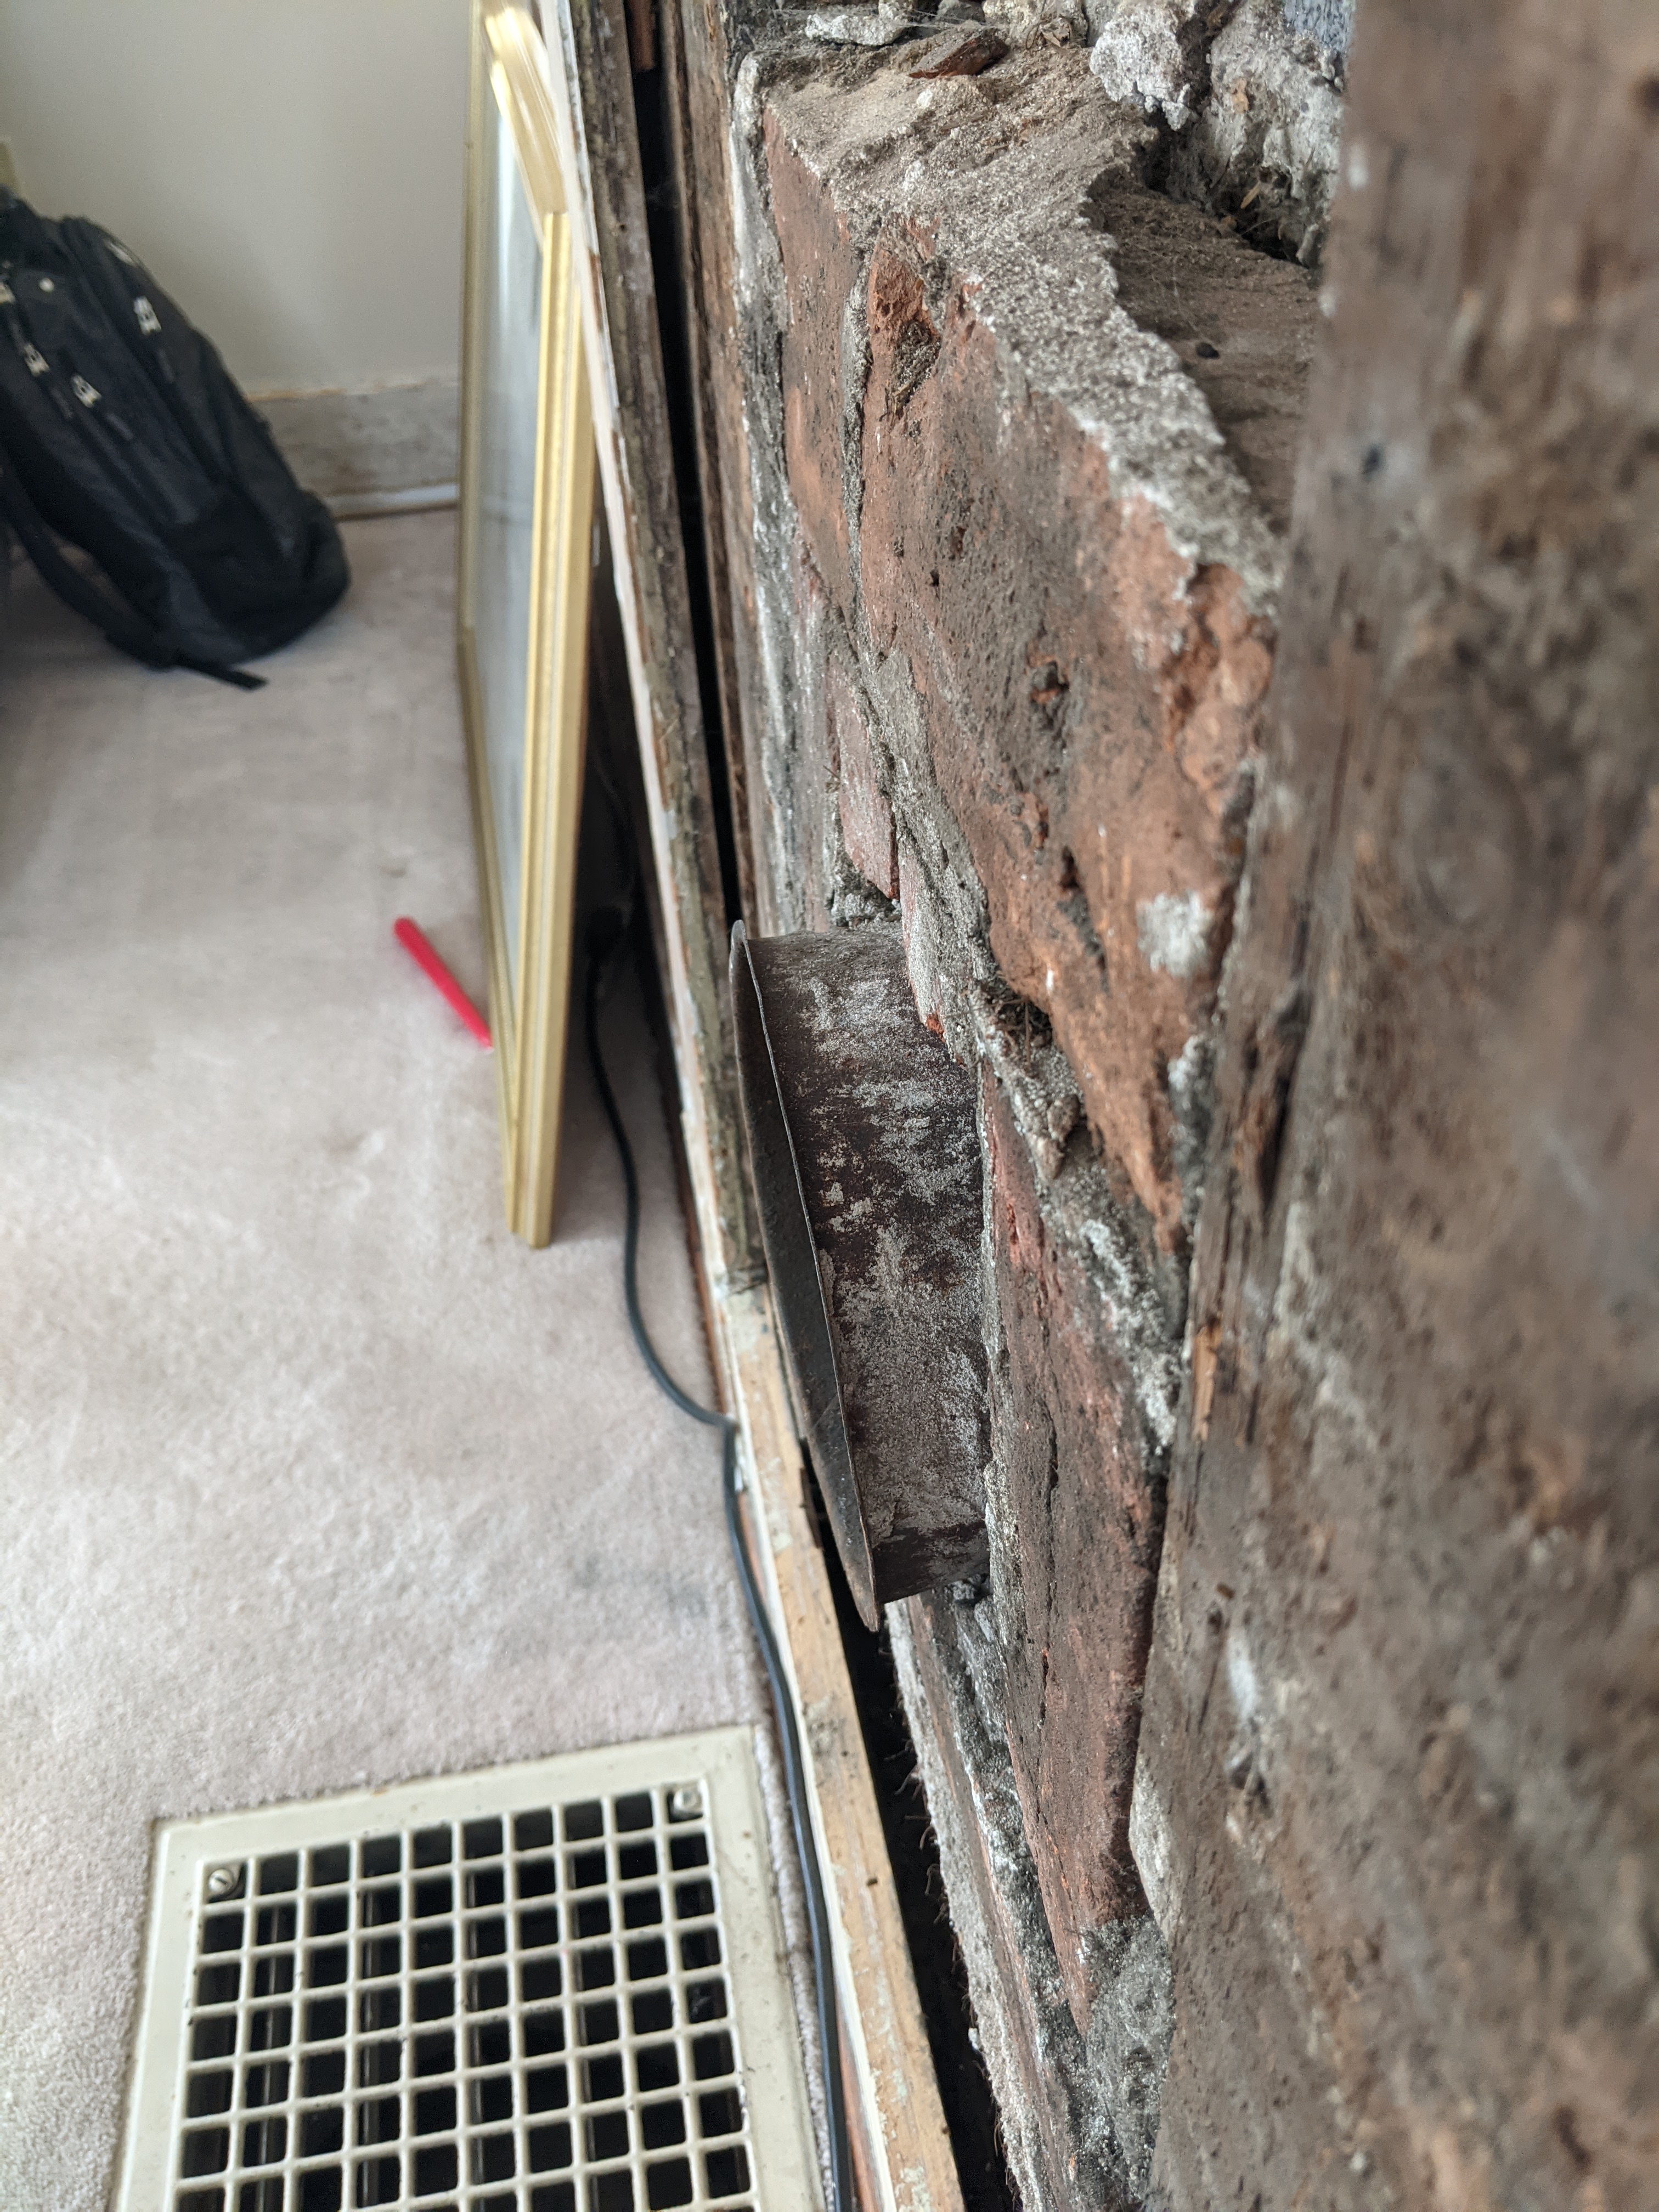
Issue is the pipe protruded. Well. Let's solve that.

Got out my tin snips, collapsed the pipe and stuck a time capsule in there for whoever rips apart the wall in the future. Seemed appropriate.

Cut a piece of 5.5mm plywood to fit. It's not perfect, but.

This will at least keep the cat from stuffing her head in the filthy space, and also keep the heat from coming out of the vent and going right up into the wall.

Next up: Fishing the dang hallway because plastic drop cloths are slippery.

Monday, December 7, 2020

The End of the Office! (sort of)

 Since March I'd been working on the office. It became clear that working from home was going to be long-term, and I wanted a space to do it comfortably. Not one to do anything half measure, I started by moving my bedroom upstairs into one of the finished rooms, and starting to strip this one.
Stripping trim when it's old, crusty, chipping, 20+ coats of painted trim, is tedious, tiresome, and dirty. There's really no way around it. I tried all different methods - heat, infrared, and chemical. While I wanted to love the Speedheater (and it did do a fine job where I could reach easily) it just send paint chips everywhere when the paint cooled and got brittle. The unit, (built in truth to strip siding, which I'm sure it's very efficient at) was heavy and cumbersome to manipulate for me.

I eventually wound up using a method from the company Dumond called "PeelAway1". It's a two part stripper. You smoosh a liberal layer of paste onto the surface you want to strip, and then put the special paper over the top  and let it cook from anywhere from a couple of hours to overnight. Then you peel away the paper and the paste and a good bit of the paint comes with it if you persuade it with a metal putty knife. This system is their strongest commercially available - good for up to 30 coats. I usually had to do two coats with a little scraping and then a gentle sanding to even out the wood.

It took some getting used to, but at least there weren't paint chips flying everywhere. I had to be very liberal with the paste (.25" thick).  I couldn't do it in the blazing summer heat because not only would the sweat pour out of the rubber gloves and down my arms, the paste would start to run off the walls, stripping and discoloring everything in it's path.

I had tried to deal with it all summer, and just didn't get far. I finally took the days off before Thanksgiving, and that combined with this past weekend finally got it done except for some punch list things! But I have moved in my folding table and can work from here now. 

It began - working from home, pandemic-style, from the couch, with the cat firmly attached to my lap.

Before. That pealing paint was like that.
I cleared out the bedroom things and started. Infrared Speedheater heating in the foreground.
(It was nice to work with in the winter.)


Layers. It would chip, they would paint over it.
I found dark green, denim blue, yellow, mustard, off white and whites. Many layers.
The dark green and blue gave me the ideas for the color scheme it wound up being.

Window sill. When they slapped in the replacement windows, they just ripped therm out, and caulked the new ones into place.

Stripping.

Wainscotting over here is just grooved.

It also had things written on it under the paint. I never made it out.


My friend Misty painting during the Pandemic.
She made a print of her Plague Mouse for me.


Still at it with the Speedheater. Here I'd found where they'd filled in the gap between the top profiled trim and the bottom board trim with caulk. This was around April.

You can see where they'd just unloaded tubes of caulk in there.
I eventually filled the gap with backer rod and caulked just the edge.

You guessed it. Another gap due to caulk.

We were still working in here at that point.
I say "we" intentionally.
She loves a good Teams meeting.

Yup, done with the Speedheater. Got a sample pack to see what would work.
PeelAway1 was the clear winner.

This was around about July.

Hey, at least the windows were done.

Started throwing spackle on the walls too.
We all know how much I love spackle.

A short lesson in raking light and spackle:
Take a light source and go into the room you are dealing with in the dark. Place the light source (flashlight, cell phone) again the work surface so it rakes across. Note imperfections. In this case, a protruding drywall screw head.

Dimpled screw heads can mean iffy drywall. Here I've given it a friend for good luck.
Then you just spackle over the whole ball game.

You can use raking light to find other imperfections too, like tape lines and dings.

Here's PeelAway1 in action.

More spackle, more PeelAway.

I finally wised up and taped the plastic around the edge of the room, so that when the spent stripper inevitably slopped to the floor, I could just roll it up and toss it. It also stopped the stuff from creeping on to the wood floor.

All stripped, washed, and sanded! I didn't mess with the area around the outlet. I didn't want to provoke electricity in this project.

Drop cloths for paint!

Primer view A.

Primer view B

Ceiling and wall paint. Ceiling is Benjamin Moore "Muresco", the best dang ceiling paint ever, as far as I'm concerned. The walls are Benjamin Moore's Regal "Classic Gray" in a pearl finish.

AN IDEA! Because of course I have ideas in the middle of just wanting to get the darn project done.
Ian had made me some lovely wooden shelves years ago. Let's paint them to match, and get them a bead board back!

It's a box, right?
We're helping.

I chickened out.
I had intended to paint the trim in here "Van Dusen Blue", the same color as the master bedroom walls upstairs. But I talked myself out of it, thinking that much dark blue would be too much in this small room. I went with a lighter tone "Buxton Blue".
This isn't exactly the look I was going for - a little too Country Kitsch for me, but I'm in too deep ($) now.

Trim Paint view A. You can't tell the walls are gray unless you really look. In doing a little more research on this color, it's often used in situations where people want white walls that won't reflect surrounding colors.

View A - all cleaned up!

View B - Done!


I moved in my little folding table, all my computer crap, and my big rolling chair to discover that the floor is slightly pitched and now I spend much of my day trying not to roll away from my "desk". Good times. It's really nice to have a room to leave when work is done, (and now my living room looks huge!)

There's still punch list things to do for this space -
• Put a proper port in the floor where I had to drill a hole for the ethernet cable.
• refinish both doors
• Put up curtains and hardware
• Replace floor grates with something less rusty
• refinish the floor (someday. not for a while.)
• Get a real desk with a file folder drawer
• Get a floor lamp
• Hang some art

Next project - The hallway between the office and the living room.