Sunday, December 15, 2019

Holi-daze

It seems that time escaped me again. Not to say that I haven't been puttering around the house, but work has been very busy, and then we threw in Thanksgiving. I know I've gotten a lot done, some without pictures (like spackle, because who wants to take pictures of spackle.) I'll try to recall through pictures, because that's more fun.
Since the intention is to tile the mudroom in preperation for a fridge and the space is so small
it made sense to tile the porch at the same time. Therefore it made sense to do all the paint work to that space too.
Here I'm stripping the multiple layers from the porch window.

The tile isn't laid yet, but here it is butted up tot the wall color (Revere Pewter) and the Super White trim.
I'm debating replacing the door with a half glass since it's so small and dark in the mudroom.

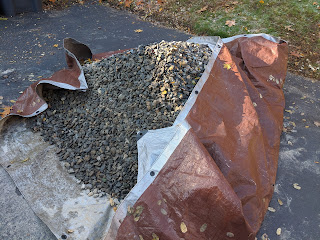
The shed roof was leaking badly, so the Saturday after Thanksgiving Ian helped me to tarp it.
The festive blue matches the door nicely. It's drying out slowly.

The big pile is near the shed is gone! Using a tiny bit of burning in my tiny little firepit,
a whole lot of chipping with my new-to-me chipper (Thanks Clockwork!) and a little bit of hauling the big stuff
to a different pile,  the shed pile is gone.

I got my Christmas lights up before one of the decent snows we got!


I decided that the mudroom should get trim around the bottom to hide whatever sins might occur with the tiling.
The rest of the house is mostly 1-by, so I got some 1x4 and gave it a good coat of Super White.
What? You don't do carpentry in the kitchen?

Trim!

While I had tools out I cut another one of the fakey interior storm windows for the living room.
This time I decided to cut a joint for the center supports. I've left it unasembled, because I can use this one as a pattern for the other 4. I've borrowed Ian's chop saw to make faster work of it.

Drying Trim.

While I had paint stuff out, I painted up the shelves for a china cabinet.
I had to replace the original shelves which were terribly warped and had some left over sample paint. Ta da.

We have had some awfully pretty snow.

A bit of grapevine that was headed to the chipper, last year's wreath ribbon,
and a bit of greenery from a local shop filled out my wreath. I looked around and realized
I have no evergreens on the lot.
Right now I'm working on fixing the walls in the "Harry Potter" room, which is small and difficult to photograph, and spackleing is not exciting. On the docket is the tiling, and also some coat rack/shelves for the porch. Ian picked up some lovely cherry wood for me. Now I just need to sand the dickens out of it and figure out how I'm going to assemble it. That might be my Holiday break project. (Around the spackle. All the spackle. Eventually paint.)

Monday, November 18, 2019

Say goodbye to the coal chute!

(Or whatever it was.)
Saturday I got busy removing the coal chute so that the foundation could be blocked and stop leaking so much cold air into the basement (right under the heat vent for my bedroom.)
I got all kinds of tools. I thought at first I could do it sort of modified wedge style, by drilling pilot holes and then pounding a chisel into it to force it to crack along a plane.
That theory didn't last too long. The masonry bits I have just weren't really up to the task.
So I sat there and pondered for a little bit and decided the only way this was going to work was to beat it into submission.
I got out my 3 lb hand sledge and an old cold chisel and started beating the snot out of it. One of the corners was already cracked, so that's where I started.
Before - This is an old picture from when I first started trying to get rid of it.
You can see where on the left they had over poured the cement right onto the step.

The corner that was pre-cracked, and the score lines I started.

Sledge and chisel, You can see the vertical cracking coming down from the score lines.

Getting the first chunk out was the worst. Because it's cement, it didn't crack nice and smooth,
so you had to widen the gaps before it would release.

Eventually the crowbar came out. Leverage! It made things a lot easier.
So did the 8 lb long handled sledge hammer that eventually came out to join the party.

The cement carefully chiseled off the granite step.
You can see the pilot holes where this step was cut using feather and wedge.

Before, earlier this summer.
After - No more coal chute. The front is much more symmetrical now.
The two capped pipes are for running the dehumidifer drain line out in the summer,
and an extension cord for season decorations.
Now it just needs another step to go on top of this step (to bring it to code), and the front of the house is good to go.

I just liked the way this pile of tools photographed in the late afternoon light.
When I was done beating up the cement in the front of the house, I gutted the porch. It wasn't all that difficult, as nothing was nailed down very securely. Finding somewhere to put all the stuff that was out on the porch while we're working on it is something of a challenge.
But it all came up or out. There's an old hope chest that was left behind by the last owner that I think I'll re-purpose into a bench for sitting out there to put on your shoes.
Last but not least, the tile for the mudroom and porch came in. Fun times ahead. This will make picking a wall color much easier!
Tile is not light.
1'x2' tile is even less so.

Wednesday, November 13, 2019

A regular old contractor circus

Tuesday I worked from home in order to be around for the septic guy and the chimney guy.
(They both turned out to be guys. All the contractors I've dealt with have been guys, 90% over 40. Let's give that thought a moment. Mommas, please let any of your babies grow up to be contractors.)

Anyway.
Both gave me windows of arrival. Both arrived promptly at noon. There was a fair bit of shuffling large trucks, and then letting them get to work.
Good news is the septic wasn't nearly full. It never occurred to me that it would have had to been pumped into order to pass title 5 last year. It'll be a couple of years before that needs to be done again. I did get the opportunity to look down the hole. It is indeed a field stone cistern, about 8 feet deep and about 6 feet in diameter. I think he felt bad because it was so empty, so the guy spent quite a while out there, back washing the cistern to break up the solids that had settled into the corners of the downhill side. It's as power washed as a cesspool is going to be. There is some fine root action going on there, so that's something to keep an eye on.

In the mean time, the chimney guy was doing his thing. I got to look up the exhaust chimney, and it was dirty, so I had him clean that. Things to note: the exhaust chimney has a clay liner and a stainless steel liner that pipes directly into the furnace. This renders the clean out door I replaced mostly moot, but it looks better. This chimney has a cap too, but... we'll get to that.
The rear chimney that I dearly wanted to put a wood stove on has a pretty narrow flue - 4.5" x 8". While it is possible to put a stove on it, it would mean having to get a custom formed liner. All in, outfitting the house for a stove (wood or pellet) using that chimney, (per this company), would be between $10-15k, which is just far and away outside what I can reasonably afford. (Granted, that's the all-in price if I understand them correctly. Stove, liner, interior work, combustibles clearances, etc.)
If I had that kind of money, I should be getting a new roof. This chimney also had a cap, which is good, but...
Whoever put the caps on these chimneys did it with all the finesse of a rhinoceros. I watched as the guy pretty much flicked them off with little to no effort. I have no idea how they've stayed on through the wind storms we've had, other than I'm on the protected side of the hill. Because of the slip-shod epoxy job, moisture is staying trapped on the masonry, and is causing the mortar to fail. To this end, the front (exhaust) chimney needs to be repointed from the roof line up, and a new mortar apron formed at the top to hold the cap down and shed water away correctly. The rear chimney, which at this point feels useless, needs a new mortar apron but no repointing.

In the end, I'm disappointed. There's two things I wistfully wanted in a house and I got neither (wood stove and porch). I got a house I could afford within a reasonable distance from work, so that's the trade off.
At least now I know (and knowing is half the battle.)
But I can still be disappointed.
Daylight savings sunrise.


Monday, November 11, 2019

Quick!

Before it snows!
Friday before leaving for TTRAG, I ran around and whipped the rest of the screens off the house and put most of my fakey-storm windows back in. Then I grabbed a bunch of reflector posts and put them in around the edges of the driveway before the ground could freeze. It looks like an airport now, but I'm ready for snow.

Sunday

Over a week later, but here's what happened last sunday -
Woke up at my pre-daylight-savings-time time. Which is good, because I needed that extra hour. Ran up to Home Depot. Got some quick fix tile mortar and another bag of leveler. Ran over to the laundromat and did a quick 4 loads of laundry. (Wash/Dry/Fold). Hoofed over to Ace to pick up a gallon of eggshell "Silken Pine" Ben Moore Regal for the guest room.
Supermarket, gas station, home by about noon.
I mixed up the mortar and smooshed it into the little holes the previous day's leveler had made obvious. Then I had to wait for it to cure before I could pour another layer of leveler, so I went outside and mowed the lawn. Really, I mulched the leaves so I could put them on the flower beds in an attempt to use the leaves for good. That took about 2 hours exactly. I mixed up another bucket of leveler and put it down. Good news is that it didn't run away this time, bad news is that it was stiffer than the day before and dried with a bit of a lip. Ian tells me that the mortar for the time should be able to make up for this.
I went back outside and started toting gravel over to the not-a-flower bed. I waaaay over ordered. Now I've got about 2/3 of a yard of gravel sitting in my driveway. I can use some to tune up the hole in my foundation, but I have no idea what I'm going to do with the rest. I don't really want it there all winter. I don't know.
After gravel was dinner, and then upstairs to hit the little spots in the ceiling paint I'd missed in the guest room. That pink paint that dries white really is a good idea, I just wish it wasn't such an up-charge for it. After the ceiling I put on the Silken Pine. It came out really nice - the best part about using Benjamin Moore is that while it's pretty pricey, even after one coat I was pretty satisfied with the coverage. I'll put on a second coat eventually, but in order to get the guest in it the next day, it was more than good enough. I then did the ceiling trim in Ben Moore Advanced High Gloss Super White and called it done. Gave it an hour and then moved in a few pieces of furniture for her to use.
I was super excited to sleep that night! But no, I was so sore I couldn't get comfortable. But I got a ton done in a short period of time.
Mowed and mulched into the bed at the end.

The second pour of leveler - I didn't do as good a job as Ian did
the previous day, but I'm told it will work.

Not-a-flower-bed, now a generator pad.That's about 16" deep with 3/4" gravel.
Gravel is heavy.

Painted guest room!

Left over gravel.
Not sure what to do with it, I'll think of something.

Monday, November 4, 2019

Saurday

This weekend saw the swap to Standard Time, and also the first time snowflakes showed up on the long term forecast. This as also a weekend where I got Ian's almost undivided attention for a day to try to figure out what to do about the mudroom. This cued a frenzy of Doing All The Things.
Friday was a long day of driving and delivering beef, but when I got home, I painted the ceiling of the guest room.
Saturday morning I woke up and tried to tidy the house - cleaned the bathroom, vacuumed, etc. Ian showed up and we discussed the mudroom floor. We thought we were going to do a false floor on top of the pre-existing floor, and kind of planned for that. After determining that the drop was only 1.5/.75", and wandering around Home Depot for supplies, and due to the fact that I wanted it tiled, we decided to do pour on leveler instead. It will be a much more solid base for tile and refrigerators.
Got all the stuff, as well as a new light for the Mudroom and a new handle for the toilet and came home.
First you need to prime the floor with special stuff, and make sure all the holes were leveler can escape are sealed. THIS IS VERY IMPORTANT. All holes. Even holes that you don't think will be a problem. Seal everything.
While we were waiting on the sealer to dry (2 hours) we replaced the light in the mudroom that is now more "utilitarian" and less "unfinished basement". Then we loved on to the toilet handle.
When Ian lifted the lid off the tank, I remarked about how rusty the water was. It surprised me, because the water coming into the house is extremely clean. Plus now due to the radon unit, I have a whole house filter. One thing let to another, and he asked, "well, what's up with the water supply hose?"
The water supply house was one of the last great mysteries Ms Mary left me. It was a wadded up mess of paper towels, rubber bands, tape, and band aids (hey, it's like bathroom tape.) I figured the pipe had been dripping due to condensate, or she didn't like the ugly cold water shutoff handle and covered it up.
Well.
Yes, it did cover the shutoff, which worked! But also the braided supply hose, which was suspiciously rusty. After I cleaned of the paper towel shroud, Ian got down there with a pair of pliers and gave it a strong look. He all but grazed the line with the pliers when somehow the hose cried, "At last! the Competent People have gazed upon me and thus to I breathe my last - Goodbye, corrosive world, I am undone!" and collapsed into a pile of rust on the floor.
Ian and I looked at each other in surprise. There's no reason I shouldn't have had a fountain spewing gallons of water into my bathroom for months in the condition it was in. Another trip to Home Depot, a few bits and bobs, 10 minutes and a SharkBite Hose/shutoff combo later, and it was all better.
I still don't know how this ended as "amusing story" and not "panicked emergency."

By this point it was dinner time. After finding a locally recommended Indian Place for take out, we came home and started mixing up the leveler.
It was... an experience. That leveler will find any way to escape where you are trying to put it. The floor is more level though, the cat only needed to be extracted from the crawl space once, and theoretically there are some voids under there now full of liquid cement.
I'll get into Sunday's festivities in another post.
Blogger's photo uploader seems to be broken, I'll try to come back and put pictures in later.

Pretty (clean!) new handle and a new water supply line.
Much less likely to fail at any given moment.

Leveler doing it's leveling thing.

It's still not pretty, but it's a lot better than the naked basement light bulb action that used to be there.

Monday, October 28, 2019

Long time, all the things!

Insulation was wrapped up on Monday, with only a couple of blown out walls.
The insulation guys were very nice, but drywallers they are not. This problem was the studs at the far end of the house were all over the map, so in some sections there was just too much pressure behind the drywall once they put in the insulation, and it cracked the drywall panels down the midde. The back bedroom is going to have to have a whole lot more love now.

This was one of their better repair jobs in the hallway.   
It's a lot quieter, and I think the temperature is more even in the house now. I would highly recommend the MassSave program for anyone looking to add insulation to their older home. It was well worth the run around.

Friday night, after poking the spackle in the bedroom I'm working on for a few minutes, I decided it was ON between me and the masking tape on the floor. If you remember, Ms Mary was a firm believer in modern adhesives, and decided loops of masking tape were the best thing for keeping her area rugs in one place.
I can approciate keeping your rugs in one place, but there are better ways. I have no idea how long that tape had been down, but it wasn't coming up for love of money. I tried hot water. Hot water with soap. Hot water with vinegar. GooGone (took off the floor finish with the tape). Wallpaper remover. And you want to know what worked?
WD-40.
I should have know this. A million years ago when I was fighting heavy list in the SCA, that's how we would get old decals and tape off of our helmets. I had to let it sit for a good while, but in the end, it worked brilliantly.
Tape.

Tape everywhere.

WD40 to the rescue!
(I tried to score the tape a little too, so it could soak faster.
In the end, it didn't seem to make a big difference.)

TaDa!
I feel so much better about the floors now. The floor refinisher people were going to charge me $150 and hour if they had to try to get it up themselves. I've added WD40 to the toolbox as my go to adhesive remover.

Saturday I had to fix a wee gap out on the porch. After the insulation guys had done their thing, I went and swapped the screen for the storm window in the porch door. The suction it created whenever I would open the porch door, or then the door into the house, would suck a little poof of insulation out of the ceiling every time. It's was like my very own fake snow machine, and I was tired of vacuuming it up.
The tiny gap where the ceiling meets the wall.

A little foam insulation and a piece of pre-primed quarter round.
No more gap. No more fake snow!
After that was done, I moved on to the mudroom. Dealing with this room is necessary before I can get a new fridge. I had mostly gutted it, but made sure it was good and empty, then ripped up the floor and patched/primed the walls.
Closet doors removed (weeks ago.)

Most of the closet surround removed (weeks ago)

Closet bar and carpet removed (Saturday)

First coat of primer.

Second coat of primer.
I have to try to pick a paint for this small, windowless space this week. You'll notice that the far left wall is being ignored. And for good reason - it's going to be studded out because right now it's just a plank wall between the mudroom and the back of the bathroom. I wish, dearly, I could make that electrical crap disappear into the walls, but I can't really. Maybe it can be made prettier though.
At least some of it will be dry walled over on the left. The floor will be leveled, and I'm thinking some sort of tile for this floor, since it will be under moisture-producing machines (the fridge and washing machine will eventually both live in here.)

Sunday was much of the same, but sanding/priming the bedroom upstairs. I could still be there, smoothing and tweaking the spackle, but at a certain point I had to call it good enough. And so for now, this room is good enough.
Not much to see here.
Spackle Spackle Spackle.

This room has gotten a coat of primer all the way around (walls and ceiling.)
Tonight will be a coat of ceiling paint and another coat of primer on the walls.

It will feel really good to get this one room done.
Of course, I need to pick a color for it too.
Dang.
I'm beginning to understand why people would buy a contractor bucket of Navajo White and do the whole house one color.

Monday, October 21, 2019

Here we go!

It's insulation day! (1 of 3, anyway.)
We discovered fun things about the construction of my house, and what outlets are on the same circits as other outlets. It was exciting!
Working their way around the house.

They have been really good about trying to keep clean.
Hole waiting for insulation.
White paint over burgundy paint over white paint.

Thursday, October 17, 2019

Sprooots!

I over seeded the lawn a little while back in a vain attempt to make the bare patches better.
I don't know if it's better, but the seeds sprouted!

Wednesday, October 16, 2019

Well, there's your problem

See the little louvered vent above the second floor windows, right under the roof peak?
That's a gable vent.
Ian and Windy were over the last two days getting the ventilation set to right in advance of the insulation people coming on Monday. Part of the deal was to make sure that the gable end vents, visually obvious from the ground, were wide enough to ventilate correctly.
I got a text this morning, as I was on my way into work to call about the vents.
"It's blocked" he said, " the one in the old side of the house, away from the driveway. With drywall and insulation."
"Huh?"
"The opening. Is blocked. Also, the "opening" is low."

Ah. To open it completely would expose the gable vent to an area that is currently the master bedroom.

"Send a picture?"
Bonus: abandoned wasp nest.
The solution (of which there are no pictures) was to open as much as could be opened above the ceiling level, to at least get SOME airflow in that end of the house.
And other bonus: They left the clapboards on and just vinyl sided over it, so I know the house was white, and the trim looks burgundy*.

*Edit 10/17 - The more I look at it, it appears that the house was burgundy and then painted over white. I think that's siding, not trim.

Thursday, October 10, 2019

Success!

Wayne the Electrician came over, and after lots of snuggles by the resident cat, he inspected the whole house, top to bottom. I learned about metal sheathed wiring vs knob and tube, and sort of what was going on in my walls.
Best news? No Knob and Tube!! Next stop - ventilation and insulation!

It's the thought that counts. right?
(Stove is electric.)

Monday, October 7, 2019

Getting chilly

With news that it was supposed to get down to freezing, I went home last week and leveled the rest of the hosta, (and whatever else got in the way.) There's nothing more icky than trying to do fall cleanup around soggy, mushy frost-bit hosta, so that had to happen.
It's sad, because it's the end of the season, but also so satisfying to put things to bed. I need to get a few yards of top soil to bring the beds up a little, and I'm hoping to acquire a chipper/shredder to mulch the bed with leaves.
So much of the weekend was spend outside.
I'd forgotten how much bigger the yard is when the greenery is low.
I left the phlox for now (trimed down a bit) for the birds to perch on in the winter.
I need to transplant the peonies (left) to somewhere with more light.

I need to neaten up this bed, but I ran out of ommph.
I have no idea what the iron pipe there is for, but it's pretty solid.
I need to do some drastic dividing/reorienting.
These burned pretty bad and bloomed late. I think they want more shade.

You can't tell what happened in this picture, but this was most of Saturday.
I went on a wild bittersweet/privet/wisteria hacking spree. So much bittersweet.
Not quite cold enough to knock off the last of the Naked Ladies, so they got a reprieve for now.
In other news, best electrician Wayne found time to come over and give the house a knob and tube inspection. Tonight's fun includes me wandering around taking covers off outlets and light switches to make his job faster. I'm going to take a pad of sticky notes and label the rooms so he know how many he's looking for when he walks in.