Monday, July 26, 2021

The Bathroom - Tiles and Doors Edition

 Part of the bathroom reno is dealing with the tile.

I've removed all of the 50's era green tiles. The white 8" are still on the floor so I have somewhere clean to walk. They will be removed and replaced with cleft Montauk Black slate. (I couldn't decide between cleft or honed, and went with cleft - in hindsight, I think I would have preferred honed.) It's too late now, the money is spent that the tiles are sealed! Painstakingly, one at a time so the grout won't stick to the top surface.

My faithful helper. The tiles are glossy because they were still wet with sealer here.

Once they dried, I laid them out to stagger them so there wouldn't be a repeating pattern. Slate is a natural stone, so no two pieces are the same, but some are very similar. I also didn't want it blotchy with all the dark ones in one section and all the light ones in another.

This past weekend, I found myself with a few hours so I took a tile that featured both light and dark area and went to Lowe's to look at wall and accent tiles. They should really have a bench so you can lay stuff out next to each other in that area.

1. Slate with a lightly textured white subway tile with black/grey encaustic looking tile.

2. Slate with the same lightly textured white subway tile and a more heavily textured mosaic.

3. Slate/white crackled subway tile with an aged blue mosaic.

4. Same, but with the mosaic in greys.

5. Slate/beveled subway tile with a marble chip mosaic.


I think my order of choice is 2, 4 and 5. #2 gives a little interest without being married to a color. #4 gives more interest without an added texture, and nods ever so slightly to the historical. #5 is just super traditional and timeless. You can't tell in this photo, but you could warm or cool the room with whatever color accessories you added.
#3 is right out because there's deep unfilled tiny pockets in that tile that would be a bear to clean. I like #1, but I think the pattern is too big for the space.

I might mosey up to Home Depot later and do the same exercise with their stock.

I've been working on the door to convert it to a pocket door. This involved removing the 6+ coats of paint, sanding, conditioning, filling and priming it.

The door is on it's side way in the back of this image. The side facing the bathroom was painted to match the same green as the walls. The side facing into the dining room was painted white to match the trim in there.

Stripping stripping stripping. A curious detail began to emerge.

This weird detail. The door was painted, originally, to have this shadow on it. The inside was brown, the outside was white.


And here you see the whole door stripped down with the weird detail on the bottom and right side, but not really along the top (it tapered up and off the edge) and nothing on the left. This was clearly done on purpose, but why? What was it meant to look like, or be? Furniture? Curtains?

I'm not the first person to reuse this door. In the previous picture the edge closest to the camera had a strip added to the bottom to make it taller. Here we see a dutchman someone added to move the hinges. This also means the door used to swing the other way.

Thank goodness the bathroom side of the door was originally shellac'd. It made stripping this side so much easier. Also got a contoured scraper with changeable blades - that helped.

On to the sanding!

Dining room side sanded.

This door has seen some sh*t. Even with all the stripping and sanding, this area at the bottom of the bathroom side was so beat up, I finally left it alone. It seems someone enjoyed kicking this door open or closed, often.

Lots of scars. This is *not* the side with the wired paint shadows.

In order to make this a pocket door, it needs different hardware. This old mortise lock pocket needs to be filled.

Lots of sanding and shaping later, it fit.

Then the pulls needed to be bored out. I made it fall over where the old hardware was so that it would stay consistent with the height of the other doors in the dining room.

The bathroom hardware is all going to be brushed nickle, so the other side of the door got different hardware. Since you will never see both sides of the door at the same time, I was cool with it not matching each other, but rather matching it's own room.

The old lock hole blew out and needed to be filled.

There's a lot going on here. Clamps to hold in the mortise pocket block, clams to hold the tiny lock filler piece in, lots of fiddly bits of wood and LOTS of wood glue and filler...

But in the end, it sanded up nicely.

Sanded.

Hit it with a 50/50 mix of boiled linseed oil and turpentine - this is a trick I learned from the window restoration people. It helps condition the really old dried out wood to receive paint better.

So beat up. I wonder if this side faced an exterior at one point or another.


Oh but wait. This is going to be a pocket door. Which means that the exact size door that swung into a casement is going to just barely give you coverage as a slider. So I needed to tack a strip on the back end for privacy and stability. It will be in the wall, so it won't be seen - so where's that furring strip I had laying around from my window project?

Strip added. It "matches"the old strip added at the bottom. Not a bad job for a furring strip that was about as straight as cooked spaghetti. A lot of GRKs, hand planing, filling, and sanding happened here.

And the first coat of Kilz oil-based primer is on! So close!

 Might need another coat of primer and a light sand before final paint (B.M. "Super White" Gloss). Hopefully this week will see the end of the door project!


Thursday, July 22, 2021

(Sorry Mom)

I've been monkeying around with the design and layout and lost the old format for the blog. Let me know if you can't find anything. I'll be working on it for a little while. All the content should still be here!


The Bathroom (trim edition)

 Now that we've revisited where the bathroom has been, let's take a look where it is now.

I had met with the contractor (finally) and we'd hammered out an (expensive) agreement. Stabilize the underpinnings, straighten the roof line, add ventilation, gut the room. I had mentioned that I wanted to reuse what was appropriate, and that is how I started demolishing the bathroom while living in it.

It started with removing the trim to be stripped, sanded and primed. One thing led to another...

Everything green, and with trim.

So much green. I'd removed the door to get better access to the door trim.

This came off with only a little fight.

This fought a little harder, and took some tiles with it.

Very era-appropriate tiles.

Well, no time like the present.
I removed all the tiles as carefully as I could, and then the drywall from behind it.
I salvaged about 300 intact tiles, plus the matching fixtures.

Then I moved on to removing the bathroom cabinet. It had been painted over so many times, in this picture it's literally hinged to the wall only with paint up the outer left side. (It pulled off the wall shortly after this picture was snapped.)

The evidence of where the medicine cabinet was. There were a lot of coats of paint. I feel fairly safe saying that this room was originally varnished wood.

Things found behind the medicine cabinet and in the cracks of the tongue and groove.

My fearless helper.

As it currently stands.

It's fun to see the shadows of the old appliances in the paint levels on the wall - the tub used to be a free-standing claw foot, and a much taller toilet used to stand in it's place until it was all covered with drywall and tile. I'm running into an issue where the T&G walls were up first - then the floor and ceiling, which is nice if you want it easily seamless. It does make it a little more difficult to take down. That's sort of been put on pause.

In the meantime, I've been dealing with the trim and door - Sanding, fixing, and converting the door from a swing to a pocket door.

Started stripping. This is with scrapers and a heat gun (and a respirator) in the basement.

Window trim stripped up pretty well.

My latest addition. Inspired by a "This Old House" hack for filtering air for viruses (they used MERV 13), I made a filter to scrub my air in the basement. I used MERV 10, and it might have been overkill, but it does pull the dust down FAST. It's just four 20" furnace filters duct taped together with a sheet of cardboard for the bottom of the box, and a fan to suck the air through taped to the top. It really works great.

The reason I don't want to replace my trim. Look at the nice tight old grain. And it's actually 1". Modern lumber isn't actually it's stated dimension anymore. Go measure a 2x4 at Home Depot if you don't believe me.

I was so happy to find shellac under the paint on much of this - it strips so nicely with heat.

Compared - Left is stripped and sanded, right is "as found." It was so nice, I hated to prime it, but none of the other trim on the 1st floor is natural.

So close...

Done! And hit with a coat of 50% linseed oil and 50% turpentine.
This wood is so dry, I needed to try to condition it.

And now with a coat of the black can "Kilz" oil based primer. Not that I ever want to, but I hope that means it will be strip-able for someone in the future if they need it to be.

Next post - The Door, and how we will never talk in polite company about what has been done to it.

Thursday, July 15, 2021

The beginning of the Bathroom renovations.

 When I bought this house, I knew I was going to have to redo the bathroom if I ever wanted to turn around and sell it again. There were 7 shades of green, no actual shower, the vanity was a $100 Home Depot Bulk Buy that had long since seen it's day, and it had no ventilation. 

Let's refresh our memories.
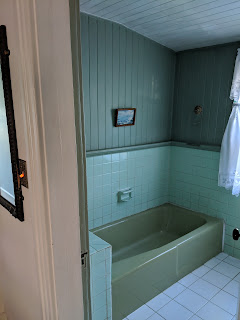
Avacado green tub with Seafoam walls? No fan?
Check, Check.

Home Depot Vanity with 2 wall sconces plugged into an outlet on the other side of the wall?
Check.

Heating vent that comes through the floor in the dining room, only to pop through the wall of the bathroom into the toilet?
Check.

Door that swings open and smacks into the toilet every time?
Check.

I've been doing little things here and there. Updated 85% of the plumbing. Fixed the electrical in the wall and installed a new vanity light and outlet. Replaced the vanity and the faucet. Did the wax ring on the toilet. Jerry-rigged a shower.

But it is time that this bathroom is overhauled. I want to be able to enjoy it.

I looked high and lo for a contractor to help. Most wanted to push their idea of what should be done on me. The time I wasted listening to ideas that would have left this bathroom uglier makes me cringe. When I told one guy I wanted a pocket door (to fix the whole door-swinging-into-the-can problem) he told me that I actually didn't.
He did not get the job.

I finally contacted a guy, (who will remain nameless for now,) who's come and actually listened to me. He's taken the concrete needs (structural and roof repair), paired it with the interior desires (pocket door, unobtrusive ventilation, modernized tub/shower), let me dictate the elements that I want to reuse (trim and door), and come up with a solid plan. If all goes well, he'll start in September.
Until them, I get to do some of the prep work - refinish the recycled elements, and demo what I can.

Which of course, I've already started and will tell you all about in the next post!

Tuesday, July 13, 2021

I wish upon a well (cover)

I took some time off last week (more on that later) but one unexpected project that I completed was reroofing my well cover. I'd like to rebuild it into a platform sort of structure that I could but a little wooden wishing well planter on, but that's not necessary right now.

Right now I just wanted it to look nicer than it did. A neighbor was giving away a partial box of pre-primed cedar shakes, so no time like the present!

Warning: there is a picture of one of my outdoor friends (the snakes) below.
I'm not actually all good with snakes, but they lived here first and they eat a lot of bugs. We've reached sort of an agreement - if I don't step on them or rake their faces, they won't startle me and they can stay. Now that I know where to keep an eye out for them, it's a little better.

The old well cover. It was pretty much shot, most of the nails were very rusty. The top cover should have been rebuilt, but not at current lumber prices. It can wait a little while.

This is what's under the cover. The boards at the bottom cover up a dry well - at the bottom of the dry well is the actual wellhead for the house. In the upper left hand cover of the base, you can see a squiggle friend I just disturbed.

Yes you. Please go find somewhere else to be.

Please? I have work to do and I don't want to squash you.

She eventually wiggled herself off into the box (not the direction I wanted her to go), and then wedged herself under the inner cover. I had intended to take a look down the hole while I was in there, but decided to leave her alone instead.

There are no progress pictures; despite what the weather apps said, it started to drizzle about halfway through, so I was hustling to beat the rain.

Newly shingled cover. It's not perfect, but I've never shingled anything before. Plus, it's a well cover, not a living structure (for anyone but the snake) so it's fine.

Ta Da! Looks a little nicer from the road (if anyone even notices. I notice though, so it pleases me.)

Someday I'll reroof the house. (I'll need to sooner than later.)
Until then, the big news is progress on the bathroom! More on that next time.

Wednesday, July 7, 2021

I think they're dead, Jim.

One upside to all the crazy hot weather we've had is that the worms in the bags should be well and truly dead. So that's nice.

44.5*C = 112.1*F.
My old meat thermometer is stuck on C.

I've flipped and flopped the bags over enough to get a nice consistent roast. 

Part of this week's chores is to move the sacks for dead worm dirt down to the front yard (to fix ruts from the worm delivery,) and by the road to encourage grass to grow. Maybe if it's not 90* one of these days.

Tuesday, July 6, 2021

And then there was help!

 Last weekend, Ian was able to come out for a couple of days for my birthday. It's not much "fun" but he was able to help me get a few things done that I needed a set of skilled hands to help with.

Finally! The railing up to the second floor is installed! And it's solid and not pulling down the wall! That was quite the task - some of the bolts are right into nice solid studs - some have fancy molly bolts holding it on to the plaster and lathe. I need to hit the heads of those with some matte black touchup paint, which I ordered from the guy who made the railing. (The little jar he had sent with the railing had dried out.)

Finally!

The next day he helped me hang the shed quilt. I've designed it in such a way that I can lift of and replace the quilt with seasonally appropriate themes. This tickles me greatly. Of course the price of plywood is astronomical right now, so I'll hold off on a new one for a while.

I took this picture a while ago - the rose has filled in since.

Before Shed Quilt though, he helped me right the clothes line post. The ledge is so close to the surface here that the further post really wasn't sunk as deep as it should have been. We dug out a roughly 3x3' square around it and back-filled a square pad with 480lbs of cement around it to give it a bigger foot. That sucker isn't going anywhere now. I just tested it with my noggin last night mowing the law, and in a contest of post vs head, the post won, so I think it's as solid as it's going to be.


Monday, June 21, 2021

I'm still here!

 I'm still here, puttering away at the house. I haven't forgotten the blog, but Blogger was being a real pain in the neck uploading photos. 

I have a few posts ready to go as soon as I can fix them!

Thursday, May 13, 2021

Let's pause and talk about invasives.

"Why do you get so upset about invasive plants, Sarah? What's the big deal, it's just a plant.
It's not taking over *my* yard."

All of these plants started off in someone's garden with the best of intentions:
Black Locust, Norway Maple, Chinese Wisteria, Oriental Bittersweet, Privet, Rose of Multiflora, Wintercreeper, Burning Bush, Amur Honeysuckle, Japanese Barberry, Garlic Mustard, Greater Celandine, Creeping Jenny, Creeping Charlie, Purple Deadnettle, Hairy Bittercress.
I have every single one of them on my property. I'm sure there's more I haven't identified. It's an invasive wasteland that isn't the right forage for birds. Isn't the right habitat for butterflies and bugs.
It isn't right.
 
You know what struggles to stay on my property? Jack-in-the-Pulpit. False Solomon's Seal. Pretty little Cranesbill (wild geranium). Canada mayflower.
Even the grapevine was struggling against the bittersweet and wisteria until I got proactive.
The berries of the honeysuckle and bittersweet aren't nutritionally right for birds. Garlic Mustard and Norway Maple change the chemical composition of the soil so that nothing else wants to grow where they are. Bittersweet and Wisteria kill trees.
Everything else bullies out something that ought to be there.
 
I've spent weeks over the past few years cleaning up other people's pretty disaster. Cutting, pulling; in some cases poisoning.
I contributed to the spread myself, before I knew. Now I know and I see it everywhere.
This is why I've become so passionate about invasives and the damage they do, and why I'm holding my breath right now, because you see, I have worms.
 
Asian Jumping Worms, to be precise.
 
Last Saturday I got a good head of steam up and went to move the last of the 6 yards of dirt out of my driveway that I had ordered back in March. 
3.5 yards was already in the front flowerbed. 
1 was already spread down by the side of the road in an attempt to get anything but weeds to grow. 
.5 had been used to patch holes around my yard. 
That left about a yard to move.

I approached the pile, gloves on and wheelbarrow ready, when I noticed a lot of worms gathered around the edge. Usually if earthworms are in the way of my chore I pitch them out into the lawn so either the birds eat them or they escape down into the turf. I picked up a worm with gloved hand and went to lob it into the grass when it *Flipped Out.*
Not a typical worm, "hey, leave me alone as I slinky my way back to the dirt" move. This was a full bodied, full fledged spastic flail.
Oh.
Oh dear.

Back in the winter I'd read an article about a new invasive worm, the "Asian Jumping Worm". Popular for fish bait (because of their movement) and vermiculture (because they are voracious) they had escaped captivity and were starting to run amok in forests in the southern states. They love moist leaf litter and reduce the leafy ground cover in a crazy short amount of time, displacing other worms and salamanders, and generally being really bad neighbors.
 
And now I thought I had one freaking out in my hand.

I Googled. I found a contact at UMass who studies the buggers. I shot video of my suspect worm, (harder than you think), and sent it to her. I pulled out as many worms as I could find and put them in a soup can. I waited.
She emailed me back and said that yes, it looked like a suspect worm, and could she come take a sample? She was welcome to all the worms she wanted as far as I was concerned. 
Yesterday she and her assistant arrived. She flipped some of the worms out of my can and verified that it did indeed look like a young jumping worm. She took my can of worms, told me to cover what I could with black plastic to kill them with heat and just keep an eye on the rest. Send her pictures if anything looked suspicious.

So this weekend I'm going to bag up and plastic over what I can. I'm going to dig a shallow trench between the flower bed and the woods, and see if I can fill it with sharp gravel. (Yes, I'm going to build a moat around my worms.) There's no way plastic will work there because it's too shady.

I was at war with the invasive plants.