Monday, May 6, 2019

Call me The WeatherStripper

Because it feels like that's all I do for fun right now.
Saturday before I had to take off to do Bee Things, I rolled down to Koopmans to pick up the 3 screens I had them do. It cost $96, and they were done in less than a week. My first-time screening didn't look so bad in comparison, but where they had me beat was that they didn't tear the edges of the screen next to the spline.
The last of the fiberglass screens is now clad in aluminum, which means that short of damage I probably won't have to rescreen any more. Weatherstripping, on the other hand...
I started putting up the screens, but that means re-weather stripping. Some areas on the north side of the house still have their fuzz. But also have moss and lichens.
Something here is no factory original.


Some areas on the east and south of the house are so badly worn, it's not that there's no fuzz, it's that there's barely even a backer left in the channel.
That little black stitched looking line in the channel is all that's left of the weatherstripping.
The black stuff is aftermarket adhesive backed rubber the former owner tried to retrofit with.
At some point if the nice weather ever comes, I'm going to have to go window-by-window with the goo-gone (to get rid of prior attempts as fixing the windows), a bucket of soapy water (to clean the outside sash and window wells), a razor blade (to get rid of old caulk), and the caulking gun (to reseal it again.
There's a good argument for replacing some of the windows. The two in the master bedroom should be done, as the seal is shot in one of them. As I've mentioned, they are not quality windows.
I've found that if I use the short-fuzz (.25) weather stripping on the windows, and the long-fuzz (.4) weather stripping on the screens, it's enough to bridge the gap. I'm getting pretty good at it. I've only got 4 more windows to do, and I'll be done with the first floor.

Today I had the furnace cleaned. I had the receipt to show that it had been done in October before the house was sold, but I wanted to make sure it was ok. The filter situation had me a little concerned, and I wanted to see what he thought of the balance. He was able to fix the filter situation in about 3 minutes, gave me tips on balancing the system, and said that if I wanted to know about micro-ducts (for the bedrooms upstairs) I'd have to call and talk to a sales guy in the office. Super nice, answered all my questions and was pretty quick. Since my system is only hot air (no AC, no hot water) it doesn't get a huge amount of stress. Now I know that it takes 20x14" filters (x2). So I'll see about picking some of those up - the "filters" that are in there are really just good at "keeping squirels out" per the cleaner.
A few more flowers are up!
Tulip!


Friday, April 26, 2019

More on screens and weatherstripping

I know this stuff is boring as heck, but I'm plodding through.
Last night I came home early to clear-coat some cement bricks for work. (Occasionally I get to do fun projects like this.) In between coats, I started in on the screens again. I figured I could at least put the little patches on the ones with the tiny beak-holes.
The things I do for my favorite account.
Patched little beak-hole.
I had gotten a little repair kit, but you could do it with any left over bit of aluminum screen. You cut a square a little bigger than the hole. Fold up two opposing edges to 90ยบ at about 3-4 rows of wires in. Pick out the wires down to the bend. Insert the little fingers through the screen, covering the hole, and then bend them over. I suppose you could cut notches in the corners and fold up all four sides, but the instructions only called for two. Getting all the little fingers to poke up through the screen, in the row of holes that you want them to is really fiddly. But all of those are done now.
I figure since I was getting out the screens, I might as well prep them for the new weather stripping (ordered today.) The best tool I found to get the stuff out was a pair of old elementary school scissors. I could get in under the strip and pry it out. Or at least chucks of it. Tedious at best, but now all the screens have been stripped of stripping.
Four of the screens are a different make. These used a tubular rubber sort of strip instead of the pile. I found out at my apartment, insects LOVE replacement windows/screens. They love all the little channels and holes for packing their nesting material into. When you don't remove and clean your screens, it becomes a multi-generational affair. These tubes were packed tight with debris.
I'm sorry to ruin your house, but you can't live here.
I stripped them off, and I'm going to try using the pile on them instead.
There are four windows that need to be rescreened, and after watching a number of videos, I decided to try my hand at it. In theory, it's pretty simple. I got a roll of aluminum screen, some spline and a tool that looks sort of like a pizza cutter at Home Depot (after confirming that they did not carry pile weather stripping, and that they did not re-screen screens.)

Implements and destruction! (Fencing pilers are handy for everything.)
In a nutshell - Strip screen, lay new screen over it (overhanging by a few inches), press channels into new screen with smooth roller end, smoosh spline down in channel to hold the screen in place with grooved roller end. Pretty simple, right?
It was still going fine at this point.
Wrong.
I was doing all right until the "press channel" part, at which point the roller tool cut right through the screen. Well, lighten up, more passes, I thought. I can salvage this. I sort of did, and ending the night wearing my headlamp I did get two screens sort of re-screened. I might be using the wrong size spline, because I had a heck of a time getting it to go into the channel. There's got to be a trick to finessing this. Practice, I guess, and not doing it at the end of a long day, in the dark, having missed the typical dinner window. I might give a slightly narrower spline a try on the next two.
This morning, they don't look so bad. A little "loving hands at home", but I think they will keep the bugs out.
Maybe by the 4th one I'll have the hang of this.

Thursday, April 25, 2019

Weather stripping, and more contractors to add to my collection

Since it's gotten nice out, suddenly all my attention is turned toward the outside of the house.
I partially blame the prednisone.
Last fall I removed all the screens from the house. A little while back I scrubbed them all. Last night I got in a roll of weather stripping, so I figured I'd start re-stripping the screens while waiting for the driveway sealer contractor to show up for a quote.
The weather stripping in these windows is so shot that in many cases there is literally no fuzz left - leaving behind a brittle little strip in the channel that is a devil to try to get out.
Well, when you're using your trusty pocket knife to try to extract it. I'm sure there's purpose made tools for this job, but a pocket knife was what I had.
Because the fuzz was gone, I had to guess the depth when ordering new stripping.
Guessing is bad, kids.
Don't guess if you can measure.
I have a roll of .25, but I figure I need to get something closer to .35 or more to make it meet adequately.
Not only is the stripping shot on the screens, but also on the window sash themselves.

I'm thinking it might be time for those purpose-made tools and a few more rolls of stripping.

A little after 3:30 the third of the driveway sealers showed up and gave me a quote. So far they are coming in at $530, $800, and $825. It needs to be done before next winter, but maybe not immediately. I looked into doing it myself, but even with expensive as it is I think it will be well worth it considering how long the driveway is.

I've started to get some interest from landscapers about the cost to get rid of two large piles of yard debris/reclaim the front right flowerbed and lawn. First quote will come this Saturday.
So exciting.
Dandelions are bee food, and that mean spring.


Tuesday, April 23, 2019

More Scrubbin'

One thing that has persistently annoyed me since I bought the house back in November was the state of the shed. The first thing you see when you pull all the way up into the driveway is the front face (north side) of the shed. It was covered in algae, moss, dirt, and lichens.
The ramp was slick with moss until I pealed it off with the snow shovel at some point over the winter.
The roof needs to be replaced too. Leaks like a sieve on the south side. One thing at a time.
Since it's been raining for days, and feel like it's going to keep raining for another week, I decided it was time to tackle it last night. It was wet anyway, so all the debris was loose. After walking across the parking lot to my car I was soaked anyway. I got out my big blue bucket, the Dawn dish washing soap, a scrub brush on a stick and went at it. It took me about an hour, and it's not perfect (I needed a smaller brush to get in the cracks) but it's so much better.
Not photo-shopped!
I need to do something about the door. All the crazy metal flashing is pealing off around the edges and the handle is... awkward (and not easily lockable.) It's getting hung up on the ramp, freezes to it's own sill in the winter (so you can't open the door). Maybe I'll just peal all the flashing and siding off and replace it with painted wood paneling and a normal shed latch. I should also maybe put one of those V water diverters on a new roof to keep moisture away from the door.
But! At least it's clean now.

Monday, April 22, 2019

Happy Easter!

Not at my house, this is at work.
All the things in the yard are starting to leaf out and grow!
It's all very exciting!
I need to pick up a fist full of popsicle sticks, so as this come up and bloom I can label them. So far, a lot of hosta, a lot of day lily, some spring bulbs (Grape hyacinth, tulips, crocus, and Daffys, but the Daffys aren't blooming).
Maybe some spiderwort, maybe some tall phlox, and Peonies.
Peonies!!

I'm very excited to see what colors everything is!

One lonely blooming tulip. The rest are just leaves.

Rhubarb! Pie time!

Glory-Of-The-Snows. Still lost in an un-reclaimed flower bed.

Thursday, April 18, 2019

Yardwork

I'm in the midst of the worst movie ever - "Poison Ivy 2 - Going Systemic".
I have another email in to my Dr. I really would prefer not to go back on Prednisone. I also have a call out to a poison ivy removal place, just to get an idea of the cost. Also a call out to a junk removal place to see how much it will cost to get ri of what's already bagged.
This was the first round.
If you zoom in on the picture, you can see were the vines were so thickly matted, I was literally rolling it up like a carpet. This made taking it up easy, but bagging it hard. About 4 hours later, I had made it out to the center of the wall.
6 bags full!
This first stretch I was super thorough. I pulled out 95% of the vine-y bits. This was Saturday. I thought I was suited up to do battle, showered twice, but woke up Sunday with that old familiar burning/itching feeling on my neck. Seems I wasn't careful enough. Pissed off, I walked out and went at the other side. Only to discover I had given myself a grand case of tendonitis in my left wrist the previous day, and I could barely grasp anything with that hand.
Now thoroughly incensed, I did manage to get the other side, though not nearly as completely as the first side.
10 bags full.
I had every intention of getting to the telephone pole there at the end. I ran out of piss-tivity about 10 feet short. Everything hurt, everything itched, and if I could have, I would have sat right down and cried. But I couldn't, because I likely would have plopped myself down on more poison ivy.
I uncovered the front for the most part, though.
The payoff is this:
Before.

After.
The large bushes are lilacs, as far as I can tell, and are still alive even though the PI and bittersweet had done their best to try to pull them down. All the vines up into them have been cut off, at least, so they won't get any worse. I've put down 100lbs of lime in the total area of the front yard, and put bone meal under the lilacs. After they bloom (if they bloom) I'm going to take a deep breath and cut them back to about 3' high. I've seen it done to leggy overblown lilacs. It's scary but it does work.
I also put down a pound of dutch white clover on all that newly exposed dirt (and around the rest of the yard) to try to get something established so the dirt doesn't run away.
I'm pretty sure there's a wisteria vine at the far end near the telephone pole. I'm not sure what to do about that, because it should be trained up something, and right now it's running wild on some lilacs. If I can get it under control, it can stay. (Go run up the telephone pole!)
If I can't, it should probably come out, since it will crush any vegetation in it's path.

Grape hyacinth


Lilac buds

Thursday, April 11, 2019

Scrubbin'

I got home tonight and had to scrub some cement pavers for work, (it's a long story.) I had my stiff bristle brush and a big tub of warm soapy water out already, so I decided I might as well scrub the screens for the house while I was at it.
There are currently 23 screens for the house. They were all absolutely filthy. Moss and lichens were growing on the fuzzy weather stripping on the ones from the north side of the house. I honestly don't think some of them had been off and cleaned since they were installed.
Out of the 23, 4 are distinctly different in make than the others. All of them need new fuzzy weatherstripping. The 4 are part of a group of 8 I have identified as needing some repair to the screen it's self. Some are as simple as bird holes, (perfectly round holes where the screen has been pushed aside, usually around the center of the screen,) but some are complete re-screens. Luckily, Koopman's down the road re-screens windows.

The 8 that need a little (or a lot) of love.

The rest, drying out in the shed.

Moving on.

I have talked to a few landscapers, and most of them deal with poison ivy infestations with the liberal use of chemicals.
Since my well is right in my front yard, I want to use as few hazardous chemicals as possible, so this isn't going to work.
I was in Home Depot last night, and may have found an answer though!
Sure, I'll cook, but at least I won't itch.
I've been trying to get away from disposable goods because filling landfills and oceans with our garbage is bad, but in this case, I'm making an exception.


Last night I wandered around upstairs and tried to force the sack of prednasone ferrets living in my brain to pay attention and make sense of the hardware and electricity situation.
A lot of doors were reconfigured on the front (oldest) part of the house. There's Norfolk latches on a few bedroom and closet doors that look identical to this example (taken from an Ebay auction out of Maine).
Eventually they will all be stripped of their generations of paint and look like this.
On those doors, there's lift off hinges that look a lot like these examples from Horton Brasses. At least, this is what I imagine they look like, under the paint. I haven't attempted to get any of these off to strip. On the doors with the lift off hinges, but no Norfolk latch, there's often a turnbuckle latch that looks an awful lot like this:
But in my case, covered in layers of paint.
In some cases, the turnbuckle has been replaces with a little Victorian spring assisted catch. Eventually, I'd like to get all the ones with evidence of a turnbuckle back to that - they are lower profile than the Victorian catches, and make more sense with the Norfolk latches and iron lift-off hinges.

I looked and looked at the wires, and have come to the conclusion that there's probably 2 electrical feeds to the second floor - a white cable that services the master bedroom, and a big thick black cable that services the rest of the rooms. I'm hesitant to start working on the rooms, because I'd really like the snake wires for switches, even if I leave the original pull chain fixtures where they are for now. I think that's going to take some more reading and noodling around in my head.
Probably best left to dealing with post-prednisone.

Monday, April 8, 2019

The Power of Prednisone

I had a really long post about what I did over the weekend, but the Blogger app for my phone is old and ate it. I have to remove it from my phone and just post from the laptop.

Poison ivy has landed me on a 10 day course of Prednisone.
I used that to my advantage over the weekend, tearing out as much of the infernal stuff as I could get my hands on, dipping the stumps in RoundUp. These drugs make my brain feel like a sack full of ferrets on speed. I have to power of 10 men! And complete inability to concentrate on anything for more than 5 minutes! Pin balling my way around the yard was probably the most productive thing I could do with myself.
I cleaned out as much of the front hillside as I could. I then moved on to the area between the road and the wall, which is a solid woven vine mat of poison ivy and bittersweet.
I'm of a few thoughts on this - a) Cover it with black plastic and a ton of mulch and smother it to death which will take years, and might now work completely, b) Quickly, while still drugged, rip the rest out, (tick tock, 7 more days of drugs!) or c) Pay someone else to deal with it, (but, $.)
I'm really hesitant to accept help dealing with it, because I really, really don't want anyone to ride the Prednisone roller coaster because of my yard. But the stuff is everywhere. All the beds, and even woven into the under layer of the grass in the yard.
I have to do some hard thinking about that.

I got poison ivy pulled Saturday, and Sunday, I vigorously raked about 80% of the yard and got 120 lbs of lime put down in the raked spots.
FYI - if you have the choice, don't get the cheapest spreader. I borrowed Ian's, (which to be fair, he'd gotten to apply grass seed, which is a lot lighter than lime.) His spreader was made mostly of plastic parts, and I spent a lot of time fighting with it. Who makes a drive shaft and universal joint out of plastic? (Agway does.)
In the end, I wound up spreading about 2/3 by hand, using the spreader as a tiny wheelbarrow.

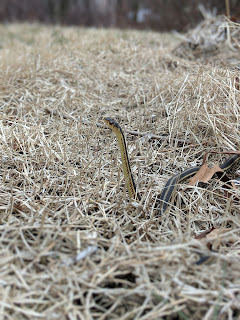
*Warning - snake pictures ahead*

I figured out where my littlest neighbors live - in a small hole by an old ground pipe to the south of the house. They are super curious, and not at all aggressive. I've named them Sampson and Delilah. They are a subspecies of Garter snake, called Ribbon snakes. Non-venomous - they like to eat frogs and spiders. That's cool. Long as they don't decide to move in.

Sampson - He's smaller and more yellow than Delilah.
He likes to just watch me from his little hole.
Now that we are aware of each other, we're ok.


I also discovered that there's a great fat woodchuck moved into a burrow on the west side of the house, just past the treeline. Little bugger is fearless. Not sure what I'm going to do about that, because personal space must be maintained with a rodent of that size.

So far, this is the first bloom that came with the property. I think there's a bunch of other things in the lawn and the treeline that are trying. Sending up a lot of green - I'm thinking about hitting the areas with some BulbTone.
Time will show me what's where.
Other than Poison Ivy.
I know where that is.

Tiny crocus!


Monday, April 1, 2019

Gutters!

The gutters guys from A&G were here today, exactly at 8 am.
I now am at full gutter strength all the way around, instead of just on the south side of the house.
Gutters!

The front (east) pitches off the far side. The driveway side (north) pitches off the front, otherwise in the winter I'd wind up with a glacier forming back there.

It sounds silly, but I can't wait for it to rain.

In other news, day three: poison ivy is still itchy.

Finally, the great outdoors

This past weekend saw my sister join me for a fun filled weekend of landscaping. Before she arrived, I ran around and tried to clean the place up, and did the month end filter changes. The one in the basement still seems fine - or at least not dirty enough to change yet.
After she arrived, and the various tools of destruction unloaded from the truck, the fun began.
Moss was scraped from the foundation apron. The driveway was scraped, and the grass cut back. A curb was rediscovered.
Curb!
Brush was hacked and slashed and chainsawed.  Bittersweet was yanked. Leaves raked. Snakes driven from the basking spots, and spouting spring bulbs uncovered and planted, thanks to a surprise visit from Terry. Even grass seed was thrown down for grins, (though now it's gone and gotten cold again.)
trim, trim, trim
I have about 8' more clearance down the side of my driveway now! Granted, all the trimming generated a heck of a brush pile. I had been unable to secure a brush dump permit or a burn permit, so it just keeps getting larger.
It's about the size of my car now.
I'm considering renting a chipper for a day and just feeding it through, since burn season ends 5/1, and it's so green most of this would only smolder this year anyway.
Alicia and I also discovered that my property is full of pokey things. Rose, some very sharp vine-y thing dubbed "sticky creeper" for it's desire to wrap around your legs and cling to your pants, and a ton of young black locust trees.
Also, I had the dubious luck to find the poison ivy with my forearms. I have to remember that I must work with long sleeves *down*. Short sleeves + yard work isn't allowed for me any more. I'll skip the pictures of the poison ivy aftermath.

After yard work was time for exploring. We walked up and tried to find the back of the property, dodging ticks as we went. We found 2 pipes and a cement marker that could be pins. I'm going to have to do some research in the deeds to figure out what's what.

Getting there.

Thursday, March 28, 2019

Moisture!

Yesterday I had a guy out to give me a price on how much it would cost to have a sump pump installed. It has to be a fancy air-tight sump pump, otherwise it will void the radon system warranty. The rough price is about $2k. This kills me, because a typical sump pump is about a quarter that cost.
At this point, I'm not convinced that I need one though. This was more an exploration for down the line. First and foremost will be the gutters and repointing, which I'm pretty sure will solve about 90% of my problem.
The first gutter guy had reached out to see if I was still interested and offered to let me pay in installments. He was professional and polite, and his price was right, so I told A&G Gutters yes. Within the next few weeks the house will now sport gutters on the east and north side. It won't be fancy. It'll use the rod hangers (which offend my aesthetic, but the pitch of the roof won't work with anything else). They will be functional and keep water from pounding on my foundation.
Spring is trying!

Soon, soon my oil tank won't have to stand in a puddle.
Hopefully this further reduces the amount of moisture headed up to the attic to feed the mold.

Monday, March 25, 2019

For every "easy" project, there's that other "easy" project.

With the closets nice and freshly painted, all I had to do was put the closet rods back up. But the closet rods, probably about 100 years old if they were a day, were terribly swaybacked. Off to Home Depot we go!
There were three closets that needed new rods. One was a half-height eve closet, and it had hand-cut little wooden braces to hold up the rod. It was also about 30" wide. Awesome.
The other two closets are the New closets, and they use 1" pipe flanges for the rod pockets. This is not terribly unusual - my grandfather did the same thing in his house. But they had used 1" wood dowels instead of a length of pipe as the rod.
One closet is about 38" wide, the other is about 42" wide.
Modern hardware stores only carry 1" oak dowels in 36" segments.
You see my predicament.
I bought 3 dowels, and cut the one to length for the old closet. It fits perfectly.
The other two... well.
At first I bought a selection of "nipples" - little threaded pipe segments meant to extend the flange. And it would have worked, functionally. It looked so terribly cobbed, I just couldn't let it go. Back to Home Depot I went (luckily, it's not that far away).
I returned the two dowels and all the nipples. (Yes, I snickered inwardly like a 12 year old every time it came up on the register.) I walked over to the pipe section, flange in one hand, old rods in the other, and had the nice man cut me 2 sections of pipe and thread them.
I should be able to come home, thread the pipe into the wall and be done, right?
Wrong.
One flange in each closet would not come off the wall, due to stripped screw heads and time. My thought was to over-thread one end, screw the pipe into the frozen side, and then back out the movable side to the wall. Easy peasey.
Nope.
The original rods must have been exactly the width of the closet, with no play. Now I had pipes that I couldn't thread into the flanges because there was no wiggle room. I had to get the frozen flanges off the (freshly painted) walls, even if I had to cut the buggers off.
Closet rods get serious.
With a great deal of mechanical persuasion, I got the flanges off the wall and threaded them onto the pipe. By the way - never trust the stock thread on black pipe - have the nice man re-cut them or otherwise make sure they are clean and clear. There's one that would only go on half way, and it's because of the stock thread - all the other fresh cut threaded ends were fine. I wedged them back where they belonged, and went to screw them down.
Never, ever fall prey to the pretty brass screws. I know they claim to be wood working screws, and they are pretty. They are a terrible lie designed to make you cry with frustration. Just get the plain old ones. You'll thank me.
Two stripped and one bent brass screw later, I just put back the messed up old slotted screws. They aren't pretty. They are functional. It is a closet, no one cares. In the future, I might replace them all with slightly longer screws, but they are fine.

After the rods were finally up, I put up a bunch of little LED motion activated and touch lights. In a perfect world these would all be wired, but I don't have HGTV's budget, so battery LEDs are solving the problem. Motion lights in the tall closets, touch lights in the short closets.
Touch light.

Touch light.

New pipe rod and motion light (pre-shelf).
No one will ever have to worry about sagging rods ever again.

Pipe rod/ motion light (post shelf)

And with that, the saga of the closets is officially done.