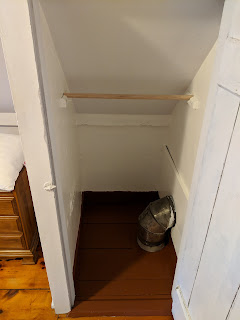
Showing posts with label Closet. Show all posts

Tuesday, September 3, 2019

Basements, driveways, and mudrooms, oh my!

I was a long weekend for a variety of reasons. But!
I got the basement stairwell as done as ti's going to be:
The paint is a light blue-grey semi-gloss.

Pre-lightswitch plate and railing re-install. The motion sensitive LED battery light is nice.

I've since added back the switchplate and railing. It's as done as it's going to be.
The guys showed up at 8:30 to start sealing my driveway - all 172' of my driveway. I felt they did a really good job, and the end result around 4 pm looked like:
Do not cross for 4 days!

All nice and black!
So that's ticked off the list.

At some point this weekend... Saturday morning? I discovered that the freezer is no longer freezing on my fridge. I lost a bunch of stuff, put the still frozen stuff in a cooler and hoofed it over to a friend's house to stuff in their chest freezer for now. Knowing I was going to have to replace the fridge, and wanting to replace it into the mudroom instead of the kitchen, I started demolishing the mudroom Sunday morning.
Closet doors off.

Shelves can't stay and accmomodate a modern fridge.

The closet was added before the outer wall of the mudroom shifted.

Closet and shelves out. Electric box will need to just be moved.
(That is the cold air intake to nowhere.)
Next up - Remove the rest of the closet shelving/rod parts, fix the walls, pull up the carpet. Try to determine where the electrical comes to that wall from. Try to get the electrical in the wall and not spidering out as a web of conduit. Eventually fix the floor, level things, and get the fridge in this room.

The idea is to put the fridge and a stacking washer/dryer on that back wall next to each other. I know putting a dryer basically on top of a refrigerator is a bad idea, but there's precious little room in this house to accommodate both. I might start with a washer and do a lot of line drying (eventually).

Monday, March 25, 2019

For every "easy" project, there's that other "easy" project.

With the closets nice and freshly painted, all I had to do was put the closet rods back up. But the closet rods, probably about 100 years old if they were a day, were terribly swaybacked. Off to Home Depot we go!
There were three closets that needed new rods. One was a half-height eve closet, and it had hand-cut little wooden braces to hold up the rod. It was also about 30" wide. Awesome.
The other two closets are the New closets, and they use 1" pipe flanges for the rod pockets. This is not terribly unusual - my grandfather did the same thing in his house. But they had used 1" wood dowels instead of a length of pipe as the rod.
One closet is about 38" wide, the other is about 42" wide.
Modern hardware stores only carry 1" oak dowels in 36" segments.
You see my predicament.
I bought 3 dowels, and cut the one to length for the old closet. It fits perfectly.
The other two... well.
At first I bought a selection of "nipples" - little threaded pipe segments meant to extend the flange. And it would have worked, functionally. It looked so terribly cobbed, I just couldn't let it go. Back to Home Depot I went (luckily, it's not that far away).
I returned the two dowels and all the nipples. (Yes, I snickered inwardly like a 12 year old every time it came up on the register.) I walked over to the pipe section, flange in one hand, old rods in the other, and had the nice man cut me 2 sections of pipe and thread them.
I should be able to come home, thread the pipe into the wall and be done, right?
Wrong.
One flange in each closet would not come off the wall, due to stripped screw heads and time. My thought was to over-thread one end, screw the pipe into the frozen side, and then back out the movable side to the wall. Easy peasey.
Nope.
The original rods must have been exactly the width of the closet, with no play. Now I had pipes that I couldn't thread into the flanges because there was no wiggle room. I had to get the frozen flanges off the (freshly painted) walls, even if I had to cut the buggers off.
Closet rods get serious.
With a great deal of mechanical persuasion, I got the flanges off the wall and threaded them onto the pipe. By the way - never trust the stock thread on black pipe - have the nice man re-cut them or otherwise make sure they are clean and clear. There's one that would only go on half way, and it's because of the stock thread - all the other fresh cut threaded ends were fine. I wedged them back where they belonged, and went to screw them down.
Never, ever fall prey to the pretty brass screws. I know they claim to be wood working screws, and they are pretty. They are a terrible lie designed to make you cry with frustration. Just get the plain old ones. You'll thank me.
Two stripped and one bent brass screw later, I just put back the messed up old slotted screws. They aren't pretty. They are functional. It is a closet, no one cares. In the future, I might replace them all with slightly longer screws, but they are fine.

After the rods were finally up, I put up a bunch of little LED motion activated and touch lights. In a perfect world these would all be wired, but I don't have HGTV's budget, so battery LEDs are solving the problem. Motion lights in the tall closets, touch lights in the short closets.
Touch light.

Touch light.

New pipe rod and motion light (pre-shelf).
No one will ever have to worry about sagging rods ever again.

Pipe rod/ motion light (post shelf)

And with that, the saga of the closets is officially done.

Vindicated

I know everyone's probably bored to tears hearing me wax on and on about paint color choices. Especially about how very disappointed I was with "Fresh Cotton", aka Warm White. Most people would have been able to shake it off, laugh, and go get a new paint color. But this got under my skin and really bugged me. I could see it in my head, and it worked, so why wasn't it working in real life?
In real life I'm a graphic designer. Color theory is a Thing. Being able to pick colors accurately is Kind of A Big Deal. To not be able to pick a color accurately, for my own walls, even if it was just for a closet, became something of a professional failing for me.
I hemmed. I hawed.
I bought new Ultra White paint.
But it didn't feel right.

The revelation came after coat #3 in what I'll call the "new" closets. These are the closets in the bedrooms over the kitchen and dining room. They have the tight Victorian floors, and someone took the time to put those floors clear into the closets. After coat of paint #3, "Fresh Cotton" finally presented as it's actual color. And I kind of liked it. Against the wood floor, it wasn't bad. It was warm white, the way I thought it would be.
In the other closets, it was still presenting like crap. There was a number of variables - one, the material. New closets are made out of some flavor of wallboard (paneling? Drywall?) and old closets are mostly horsehair plaster. Then there was the lighting. New closets are tall and shallow, and let in a decent amount of light. Old closets are half-height and deep, with little natural light. The last variable, and the one I could do the most about, was the floors. New closets are hardwood, old closets were a selection of white, brown, and green paint.
I had some grey floor paint ("Thunderstorm") left over from the basement project. I was going to make do with that and repaint the insides of the old closets. But Thunderstorm is earmarked for painting the basement stairs once I can prop open the bulkhead for an extended time. Plus, while I'm starting loosen up, painting the insides and walls of the half-height closets had gotten downright painful. Floors, with the help of gravity are far easier.
I took a leap, returned a bunch of Ultra White paint to Home Depot and drove over to Koopman's, the local Benjamin Moore dealer.

When you've been using run of the mill paint, and you treat yourself to the Good Paint, it makes it hard to go back. It's just so much nicer to work with. I could drone on about quality paint, but I'll skip that part.

One quart of "Clydesdale Brown" later, I proved my intuition right. "Fresh Cotton" was fine, it was the floors messing with my head.

Old floor.
New floor. (New closet rod too, the trials of which will be in a separate post.)
Old floor (the back is dark green.)
New floor.
Old.
New.

It is with great pleasure that I pronounce the closets are painted and done, all but the hardware, which will be it's own post. I have to let those painted floors cure for about a week before I go stacking tupper-tubs on them, but it's so nice to walk up and just look at them. All nice and clean and done.

Wednesday, March 20, 2019

On Paint

Bear with me. I've been stuffing and unstuffing myself into awkward closet spaces since Saturday. My everything aches.

Say it with me - No one is going to be in your closets looking for brush marks.
No one.
Not your realtor, not your friends, not your mother.
No one reading this blog (Hi Mom! Hi Dad!) are in the real estate market at the level where we have to worry about a potential buyer showing up and hearing, "Oh My God, we simply can not buy this house Chad, there's brush lines in the closets!"
No one cares, as long as there's ample clean space that holds stuff.
If you're going to take it upon yourself to overhaul the closet situation in a cobbed old house - here's a tip. You're going to be wedging yourself into some very uncomfortable places. Maybe go on a diet, and take a month or two of yoga before you start. Stretch liberally.
Then, and I can't say this enough, buy the good paint.
It seems counter intuitive, right? It's just a closet, cheap paint should be fine. But here's the thing - even though you cleaned the space (contortion act #1) and then primed the space with stain blocking Kilz (contortion act #2) and laid down a coat of paint (contortion act #3) you're going to look at the uneven streaky surface and know deep down in your heart (that even though it's just a closet) you're going to have to wedge yourself back in there for a second coat of paint.
If you'd just bought the good paint with primer and crud built in, you'd be done. But no, because you got the cheap paint, you're got to get back in there for round 4, little buddy. Ready the aspirin.
At least you'll have fun stories for your chiropractor. (Shout out to Dr Dan!)

A note about color.
Warm white seemed like a good idea at the time. It was cold out, so anything that promised warm seemed like a good idea.
But you don't like warm white. It's not white. It's not yellow.
If you want yellow, buy yellow. If you want white, get white. You're stuck with it now for the closets, because you've got a gallon of it, (and no one is going to look critically in the closets anyway and if they do, get new friends.) Once the closets are done, you're going to use whatever's left for primer. Or to paint beehives. Maybe once you paint the floors, it won't be so bad, but right now, against the old green floors, it's just horrendous. You're going to have to go get warm-toned floor paint to try to salvage this, friend. Brown might work. Good luck.

But it's the first day of spring! Now we begin to see what lives here with me, other than the birds and the squirrels.
Promises of things to come.

Tuesday, March 19, 2019

Everything hurts, but everything is primed.

Painting upside down and backwards is going to keep my chiropractor in business. But all the closets are now primed. It's already brighter, if not perfect.
(It's an old house. It will never be perfect, but it can be better.)

Cleaner!

Brighter!

The plaster is going to be what it's going to be. I'm not going to waste my time tearing it out and replacing it if it's going to stay put. Some of it's a little loose, but so far so good. This is the bedroom that had the green trim.
More plaster, out in the hallway.

Primed!

Next up - the application of "Fresh Cotton" and "Thunderstorm". I hope the slightly warm white plays ok with the grey floor paint I already have from the basement door.
They are closets. I really don't need to overthink colors in the closets.

Monday, March 18, 2019

Toss those plans right out the (open) window!

I had considered re-potting plants and cleaning the basement this past weekend. The only basement thing I did was repair the chimney door (see previous post.)
Instead, because it was just so darn nice out Saturday (45 is nice, ok?) I threw open the windows upstairs to let the place air. I got to looking around. What did I need to do upstairs? I needed to put stuff away, but I was reluctant to stuff things into closets that needed attention.
Right.
Thus began the Great Closet Overhaul of 2019. I emptied out whatever had been put in the closets into their corresponding rooms and began scrubbing.
I'm pretty sure some of those closets haven't seen paint since they were constructed.
6 closets in total were scrubbed. 6 closets had holes patched. 3 are plaster over lath, 2 are... wallboard? 1 is a combination of the two. Everything is getting paint. Rods and shelves were removed! Floors were covered! (Or not. Some are painted, some are hardwood.) 3 have been primed! (Yay Kilz!)
Before:
One of the eve closets (there are two, I only took pictures of one, they look the same, with the exception that this one has a green stripe on the purlin? where as the other one was left white.) Plaster walls, some unfinished, with cleats for long-gone shelves and cracks where the house has settled. There's evidence that the green floor used to be in all the rooms on the oldest section of the house.

"New" closet in the bedroom over the kitchen. Wallboard and hardwood floors.
This narrow board floor is throughout the "new" section of the house, and appears to have a wax finish.

Old built-in closet in the main bedroom, over the living room.
This heating duct is the only source of heat for the entire second floor.

The other "new" closet. This one has a lock, which is a little curious.
I didn't take a picture of the "combo" closet because there's really no good way to photograph it.
This will need to be a multi-day process. I'll post "primed" pictures as I finish up that step.
(I also need to get some new closet rod.)

The basement can wait for weather so warm I want to be in the cold, damp basement.

Sunday, January 6, 2019

On the subject of closets

There's a closet upstairs, off the hallway from the master bedroom. It's hard to describe, but it's a double entry closet that was built out of the original closet when they put the addition on, and opened up the two rooms behind it into one. So this closet acts as a closet and a wall.
There was a sketchy pole up there, permanently mounted into the frame. Rather than cut it out and replace it, it was "reinforced" with a combination of copper rods, electrical and masking tape, and black satin ribbon.
Also, it was gooey from tape residue.
So me and my trusty handsaw removed the "rod" and me and my trusty screw gun replaced it with a new one.
Aaaaahhhhh. So much better.
Sometimes it's the little things. 5 minutes later and it's done.

Another day, another closet

When I woke up on January 5th, I didn't intend to deal with the living room closet. But in that way that things happen, I wound up dealing with it. Mostly because I want to use it, and I don't want to stuff things into a dirty space. Also, I'd stripped off it's hardware to clean, and figured, in for a penny, in for a pound. The thing is, the closet is 28" deep, 14" wide on the inside, and about 10" at the door, as you pass from the hallway into the living room. Not a lot of space to maneuver in, and really bad to try to photograph. I had to use the headlamp, because once wedged in, I became a door.
Tiny closet is tiny.
Yes, I wedged myself in there.
Yes, those upper wood boards, (presumably for long gone shelves)
are not level to each other.

I had just enough Kilz and "Lilac Muse" left over from the pantry closet to do it. I also picked up a quart of gloss black to do the teeny, tiny floor, since it was super beat up unremarkable wood. (Not narrow board like much of the rest of the house, and the pantry closet.) I think I'll do the floors in the eve storage upstairs to match.
I installed a little battery operated motion sensor light inside this space. I don't see using it for a lot, since it's weirdly deep, but it will be good for storing winter coats in the off season. And tomorrow, after the second coat of floor paint, it'll be done.

Friday, January 4, 2019

A closet I can feel good about.

On the final walk through the day before the closing, Donna (my realtor) and I were on our way out the door when I remembered to check the funny little closet in the hallway that divides the dining room from the stairwell to the second floor and the living room.
What to my wondering eyes did appears but shelves and shelves of china patterns. I already have numerous sets from my own family - I didn't need more. But for the sake of the closing, I agreed that it be included in the sale.
Upon moving in, I need that space to store my own things. I hauled all the china out and discovered that the closet is lined in textured pressed tin. Also, it was filthy. Decades of contact paper was coating the shelves, giving it a permanently tacky feeling.

One of many patterns, but this one came with decorative pleated edging!

Old shelves. 14" wide, 2 parts each - a narrow board nailed horizontally to the back of a wider board.
Contact pattern #2. (They've been relocated to the shed for stripping/reuse later.)

Closet pre-cleaning.

I decided it was going to be the first major overhaul. I vacuumed it thoroughly, scrubbed it with TSP substitute, primed it with Kilz, re-secured the shelf cleats, and painted the whole interior with semi-gloss "Lilac Muse". It's a slightly purple off-white. I then cut new boards for the shelves, and painted those as well.

Before Shelves - I went with a "no VOC" paint because of the tight space.

First course of shelf boards in!


I got the shelves in and painted, and I've stuffed stuff in it for now to get things out of the dining room, but I want to put under-shelf lighting in. Things go missing in the back. I'm still researching how exactly I want to pull that off. I have my ideal state, but then I have my affordable options.
Once the closet is finished with lighting I'll post a final picture.