Tuesday, January 25, 2022

Making good on those new year's intentions.

Well, I've accomplished one big thing already this year that has nothing to do with the house.
I took "advantage" of perhaps the worst possible market in memory to trade in a car, and traded in the '14, 60k miles Forester "Touring" Turbo.
Meet the new CRV. It's a '16, has 140k miles, 4 cylinder, takes normal gas and doesn't need fancy maintenance. I didn't realize how much I'd gotten used to sheer power of the flat 6 Boxer engine. It's like going back to driving a lawnmower. But it's a cheaper ride in the long run, I hope.

I just hope this car treats me as well as my first CRV did.

I also started a project for me. I've needed a full sized bed frame for a while, but nothing I found was sized proportionally for my house or priced right for my budget. Then I stumbled over a listing for a free bed - someone had started to refinish it but then ran out of time and ambition. I contacted the woman, and picked it up last Saturday. It looked fine from the onset, but...

The foot board. Decent original condition. Some scratches commensurate with age.
Appears to be mahogany veneer.

Ah. The head board is where the former owner started her refinish.
With an orbital sander with a very aggressive grit.
So many swirls.

Well, let's take this down. Time to get the hardware off, like those casters.

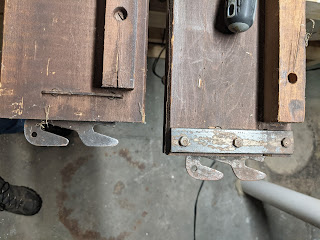
This bed has seen some stuff. Only one rail had one original setup - the one on the left. The bed hooks are inserted into a slot in the end, then two little metal slugs are put into two holes that pin the hooks in (you can sort of see circles near the ends behind that staple), and then the wide staple is hammered over to hold the slugs in.
On the right, you can see that the staple is gone. It's been replaced with a piece of steel bar with three machine bolts that pass all the way through the rail, creating a wood, slug, and hook sandwich.
This is not an elegant solution, but it's certainly a functional one.

No two ends of either rail are the same.
There's literally 3 different size bolts, one for each end of the bed.
The smallest bolts (on the left hook here) were so bent out of shape they will need to be replaced.

Taking off the finish - it was just barely kissed with shellac, I think. I started lightly with a 120 grit, and it was more than enough. I took it down to 320.

The headboard, (where she had started with 60 or 80 grit I think), took the longest to work on. Not because the finish wouldn't blast right off, but because I had the delicate chore of trying to smooth out the deep sand swirls without blowing through the veneer. I'm pretty sure she was going to paint it a color. I'm taking it back to a traditional mahogany stain.
I'm also resigned to never getting all the swirls out.

The little reed details on the foot board gave me trouble. It's about 3/8" wide, tacked on with teeny tiny little pins - maybe literally sewing pins that were cut flush. The grain runs diagonal, and it was happy to break if you looked at it too hard or bumped it with the sander. There was a lot of creative gluing and clamping at this point.

The bed's composition is mahogany veneer on a poplar frame. This isn't a great picture, but the green staining in the grain sort of gives it away.

I hit all the pieces with a wood conditioner to make it take the stain more evenly. I was half-temped to just leave it natural/conditioned, but then it would look very patch-work-y.

Here's where knowing your species is important. I don't so much care because these are just the rails that will be covered most of the time anyway, and this is not a piece of High-Falutin' Furniture. On the left is the (probably original) poplar rail, and on the right is the (probably replacement) pine rail. Both were hit with the same conditioner and same stain for the same amount of time before being wiped, but look at how differently they absorbed the color.
If you're doing High Falutin' Furniture, it's recommended that you keep spare pieces of wood you're using in your project, and you run through different finish scenarios so you know what you're getting in the end.
This project is not that.
I'll give the poplar a second coat of stain today to try to bring it darker, but that'll be that.

*NOTE: Don't do staining projects inside in the winter unless you have some sort of exhaust system if you don't have to. It Stinks. A lot. While the respirator made me blissfully unaware of this while I was in the basement, when I went upstairs I was fully aware of my mistake.*

I have a number of different top-coat options. I have 2 quarts of Shellac I could use (glossy end result). Since this is not a high-abuse piece, I could probably do a few coats of that and it would be fine. Down site is that it scratches pretty easily. I also have a quart of a water-borne "Old Masters" clear finish that's intended for outside projects that would probably be fine (satin end result). I'm guessing highly scrtch resistant. I also have some random poly finishes downstairs, but not a lot of any of them.
I think I'm learning toward a satin finish so that it looks more natural-wood-like, but I'm not so invested in the natural-wood-look that I want to fuss with an oil finish.
I'd like to get this done and under my bed sometime in the near future.
We'll see where I wind up after my trip to Koopman's for new bolts this afternoon.

And if I hate it, I can always paint it again.


According to my files, these are only 12 weeks away!


Monday, January 10, 2022

A new year. Again.

Beats the alternative, I suppose, but this year really just feels like 2020 on repeat already.
I'm rather tired of this record skipping.

There's not a ton new to report, I'm afraid. Still no bathroom (but that won't happen now until spring), still no living room windows (that also doesn't appear to be happening until spring). Ian started on one of the damaged house sills, but can't really finish until, you guessed it, spring. (He did cut me nice new window sills for the living room though.)
All of this is triple-y frustrating because I just had three blessed, audacious, weeks off. I don't just get three weeks off ever really; it was a confluence of company-wide vacation time, accrued vacation time, and a changing vacation policy at work that meant I had to use a bunch of it all at once or loose it. I might have one more change to pull off something similar this year, but other than that, the next time I can look forward to that amount of time off I'll probably be unemployed, retired, or deceased.
Yay, capitalism.

I managed to pull a few things out.
I hiked over 40 miles in 3 weeks, so that was something.
I puttered.

You will recall the chimney, as it appeared after having been hidden behind paneling in the back bedroom

Then there was the application of InsulStic, which was a saga in it's self.

Wet InsulStic

Dry InsulStic

One coat of drywall compound to smooth.

2 coats of drywall compound and a drastic improvement!

And sanded/primed/painted. I really liked the look of "plaster" for this, so I primed and then painted the surface with the ultra-flat white ceiling paint from Benjamin Moore. It's soft, and different enough that you know it's not just a weird detached wall. I'm going to see about getting two pieces of wood and shape them as "filler" to be recessed a little behind in the gaps, so you can't see where the chimney still looks crappy because I can't reach it.

I woke up one day depressed at the lack of progress and decided to make my own progress. Thanks Al's Rubbish for bringing me a dumpster one day and taking it away the next! (Right before the snow!)

All of the debris that was supposed to leave when work on the bath room started in September was still sitting in my shed, making it almost unusable. I could barely move around and couldn't get the snowblower out if I wanted to.
After I hauled everything out of the shed and basement that needed to go, I moved everything around and ripped up the weird linolium flooring the former owner had in here from her dance studio days. This white flooring was like a sheet of ice when it would get wet in the winter.

Once Dumpster Fun was over, I started on the 3rd to last window for Ian's Shop.

I've got my method pretty dialed in at this point, now it just takes time.

I had just enough cement to do this window! Time to order more.

It looks great in the sash!

It looks dumb next to it's partner.
Sigh.
This is the drawback to not doing paired windows at the same time - you make decisions independent from use, and then this happens.
What's wrong, you ask? It's unbalanced and badly proportioned compared to the one on the left. I hate it, and I'm going to remake it. They will never match because the actual dimension of the windows are different. What I'm going to do is take that column of big center panels of glass in the right hand window, cut them in half vertically, and then move the resulting skinny panels to the outside columns. That way it's more balanced, and you won't notice cheater skinny panels as much.

On a nice day, I went outside and cut brush, because that's what you do in the winter. It's been such a screwy winter the sap was running. This is before.

This is after. Only 3-4 wheelbarrows full, but sight lines along the road are much improved. This will never be a groomed area - I think I'm going to throw milkweed, aster, and goldenrod seeds down here, that way I can just mow it down in the late fall every year. I may stash a few redbuds behind and along the wall.

The last thing I did was also done in a state of sort-of desperation. I'm reaching the end of my rope living in perpetual construction. Other people can turn it off and not see it, but I can't, and no amount of trying will allow me to be able to willfully ignore it. So, despite not having the replacement windows, I started on the living room, washing the ceiling. That's the grunge line between "clean" and not.

Gosh, I do love Benjamin Moore's Muresco.
So flat. So conceal-y. Those are the wires for a light fixture that I will address in another post.

Then I decided to prime the wall with the mantle. This wall a) has no windows, and b) I always intended to be an accent color, so why not?

Ta Da! Accent wall colorized! Just ignore the dumpster fire in the reflection.
But... I thought it was going to be darker...

Oh. Because I thought it was. I grabbed the can from downstairs that I thought I had painted the master bedroom - "Van Deusen" blue. I forgot that I chickened out at the last minute and went with the lighter "Van Courtland" blue.
I thought I was putting on the top color in this chip chart. Big difference.
*Shrug* really - It's a ton better than it was, and if I want to take it darker in the future, I can. Easier than trying to back out to a lighter color.

So that's what I did on my winter vacation.
Doesn't feel that monumental, but it's something.

Plans for this year:
• Get the windows in and the dang living room done. (Minus the floors. Those will have to wait.)
• Get the bathroom done. Please, please let the bathroom be done.
• Pony up and just get the front step done.
• Rebuild the platform over the well.
• Finish the house sills.

Anything else is gravy, frankly. I want to continue hiking, maybe get a dog, trade in my car for something that isn't a money-guzzling turbo, and plan out my gardens a little better. That's it.

Happy new year!

Wait, what?
Don't you be getting any ideas.
I'm the queen of this castle, lady.


Thursday, December 9, 2021

Sweeps!

 In my continued effort to keep warm air in and cold air out, I managed to find unobtrusive door sweeps for both the kitchen door and the door going upstairs. I hated drilling into my freshly refinished doors, but it's a little better now, and I don't have to jam towels under the door except on the most bitter nights.

Kitchen Door - It looks like it belongs on there. I had to put it on the outside because that's where the nice straight threshold will touch.

No light coming through, which means no air coming through! (Or at least less.)

Sweep on the stairs door.

Well... it's... better. A smaller gap, anyway.

Next up in the air containment projects is extending the weird door trim for the stairs door. I've cut the piece to fit, complete with notched angle. I'm just waiting on the paint to dry.

The door closes against this. Why doesn't it go all the way up?

This is the gap at the top of the door when it's closed. I don't get why they didn't just run it up to the ceiling. It must have served some purpose at some point to have that gap there. It appears intentional.

The other thing I'm considering is changing out the hardware on the stairs door. When it was cover in 6 coats of paint, friction and gravity held it closed. The hinges were balanced such that after the half-way point it would swing close on it's own. While I managed to balance the hinges when I replaced them (GO ME!), not there's nothing keeping it closed. If the cat was more ambitious, she could flip it own with a paw. 

Decision time!

Do I want to keep the cute, inexpensive knob because it's pretty?

It's a glazed blue ceramic cabinet knob. Sorry about the bad picture.

Or do I want to install a new old-style latch, which I already own?

It would look sort of like this, as you head up the stairs. Because of how the door is put together, the thumb-latch part would have to go on the other side.


Tuesday, December 7, 2021

That time of year

Things have gotten a little crazy, what with holidays and work. If I'm posting once a month, I figure that's a good thing!
I have a 3 week vacation coming up over Xmass, so I'm hopeful to get a ton of things done. (Which should result in a ton of pictures!)
Of course, I'll be happy if I can even get 1/2 of that ton actually done.

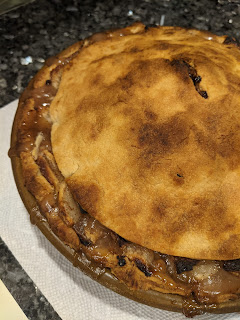
It's the pie time of year.
 

Let's see - what have I been up to? Stripping paint. Endless miles of trim. Last I left you, I'd ripped out most of the carpet in the living room, (pull the last out from under the TV stand last night), and started ripping out the baseboard. The intent was to take out all the baseboard and just replace it with new rather than trying to strip it, in an attempt to do something easier. After yanking out that bug damaged one, I decided that given all the rusty square nails holding them to the wall it would actually be easier to "just" strip it in place.

If you've missed previous updates, nothing about stripping paint is easy, FYI. Chemical strippers are messy and corrosive; heat stripping is dusty and slow. I can do about 5' of 6" wide trim in about 2 hours with the heat gun, more if they are loose pieces down on my workbench.

I pulled up the shoe molding from around the bottom of the baseboard and discovered there's really no insulation back there. These are the cavities that they would have shot full of expanding foam if I had opted for the "rim joist" insulation when MassSave did their thing. The issue with expanding foam insulation is that it essentially encases your wood timbers in plastic and nothing can breathe, so it just rots. This old house needs to be able to breathe, at least a little.
Finding the balance between it breathing and me freezing is the key.
I took the shoe molding down stairs and sanded it. (It had only been shellaced). I'll give it another light sand, maybe stain and re-shellac it. It's not in terrific condition, but it's salvageable without having to paint over it.
In terms of insulation, I'm investigating rock wool and wool-wool insulation, because I figure it's "pokeable" into the small gaps and holes without having to open up the whole walls. I REALLY don't want to have to open up these walls. It's just more work than I want right now. Spray foam would be easiest, but for the reasons I mentioned is right out.
My goal is to having the living room realtor-acceptable-grade by the end of my winter vacation, on 1/9. That doesn't sound difficult, but I have 20' of trim left to strip, the main door and the closet door to strip, the walls to fix, then every thing to sand, wash, prime and paint. I'm not even entertaining refinishing the floors right now. That might not be something I ever do. Maybe it will be my parting gift to the house when I move out some day, (floors are MUCH easier to do when you don't already live somewhere). We'll see.

In other news the Bathroom Guy, already so delayed this year due to supply and crew issues, has Covid. He sounds miserable. He's had to sit down the whole crew for a while, and was honest in that he's not sure what this is going to do to his schedule. Upon finding this out, and with the temps going down to below freezing at night I went to Lowes, burned some gift cards and got some tiny sheets of board insulation and a roll of mylar bubble insulation. I've covered the holes as best I can. I'm not keen on the idea of them pulling the roof (and re-shingling) the bathroom in winter in New England. I'm equally not as keen on exposing the one room with the majority of freezable pipes to the elements of winter in New England. Burst pipes are the last thing I need. So... Stay tuned. This does give me a little more time to think about tiles and things. Current plan is for him to still do the foundation work and the windows, and wait on the major bathroom gut until the weather turns better in the spring. Fingers crossed.

The bug-eaten baseboard is out!

The bug-eaten stud is not compromised! That damage is superficial.
And the sill area under this that was damaged has now been mostly fixed by Ian and Windy. There was a confluence of moisture and sap wood that allowed for bugs to get in, but both of those things have now been dealt with, (and a liberal amount of TimBor applied so it should never happen again.)

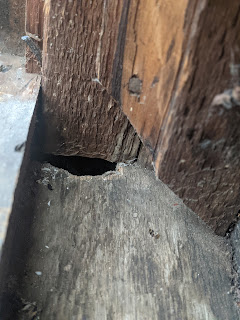
One of the mouse holes in the corner. Has now been stuffed full of copper mesh.

A wind brace hiding in the corner, along with snaked electrical that goes Lord Only Knows where.

It got cold, and the window trim in the living room had been doing a remarkable amount of insulating. Since the trim is going to go right back up over these areas, I taped the plastic to the wall and shrunk it on. The tape will pull the finish right off, but it will be covered up in this case. I'm warmer, for now.

Insulation Made-do. The silver does brighten the area up, even if I feel like I'm showering in some weird redneck space station.

This hole was big enough to require more structure, thus the board insulation.


This is the pattern. I tell myself that you eat an elephant one bite at a time. I'm trying to intersperse the long-haul projects with littler ones so that I have some quick wins to celebrate.
The furry roommate would like the take a moment to celebrate her new heated bed. Since I took out the carpet, the floors are quite cold, so I figured this was the least I could do for her.

Heated beds are the BEST.

(I'm going to live in blissful ignorance of my electric bill until it comes in. Hopefully with the dehumidifier running less, I won't notice it.)